- Home
- ...
- Configuration
- How to intall
Sensedia CLI (ssd) is Sensedia's command line interface.
It allows you to interact with Sensedia API Platform through the command line of a shell, creating and managing your APIs in an easier and quicker way.
Browse the menu on the left for information on the available commands. Below you will find helpful tips to get started with Sensedia CLI.
Quick access
See on this page:
- Downloading the binary file: the steps to download the Sensedia CLI binary file.
- Authentication credentials: API Platform 4.x: how to obtain authentication credentials for API Platform 4.x.
- Authentication credentials: API Management (Sensedia Platform): how to obtain authentication credentials for API Management (Sensedia Platform).
- Installing the binary file: the steps to install the Sensedia CLI binary file.
- Configuring Sensedia CLI: the steps to configure Sensedia CLI.
- Usage modes: the usage modes of Sensedia CLI.
- Help: getting help directly from Sensedia CLI.
Downloading the binary file
Firstly, you need to download the Sensedia CLI binary file from its official site. On this site, click on Download CLI and then select the desired version of the product and which operating system you will be using it on.
Once the binary file has been downloaded, a few more steps will be required to complete the installation. Find out more here.
To use Sensedia CLI, you need to be authenticated with Sensedia API Platform. The procedure for obtaining authentication credentials depends on the version of your Sensedia API Platform:
- Obtaining authentication credentials for API Platform 4.x
- Obtaining authentication credentials for API Management (Sensedia Platform)
Obtaining authentication credentials for API Platform 4.x
Step 1
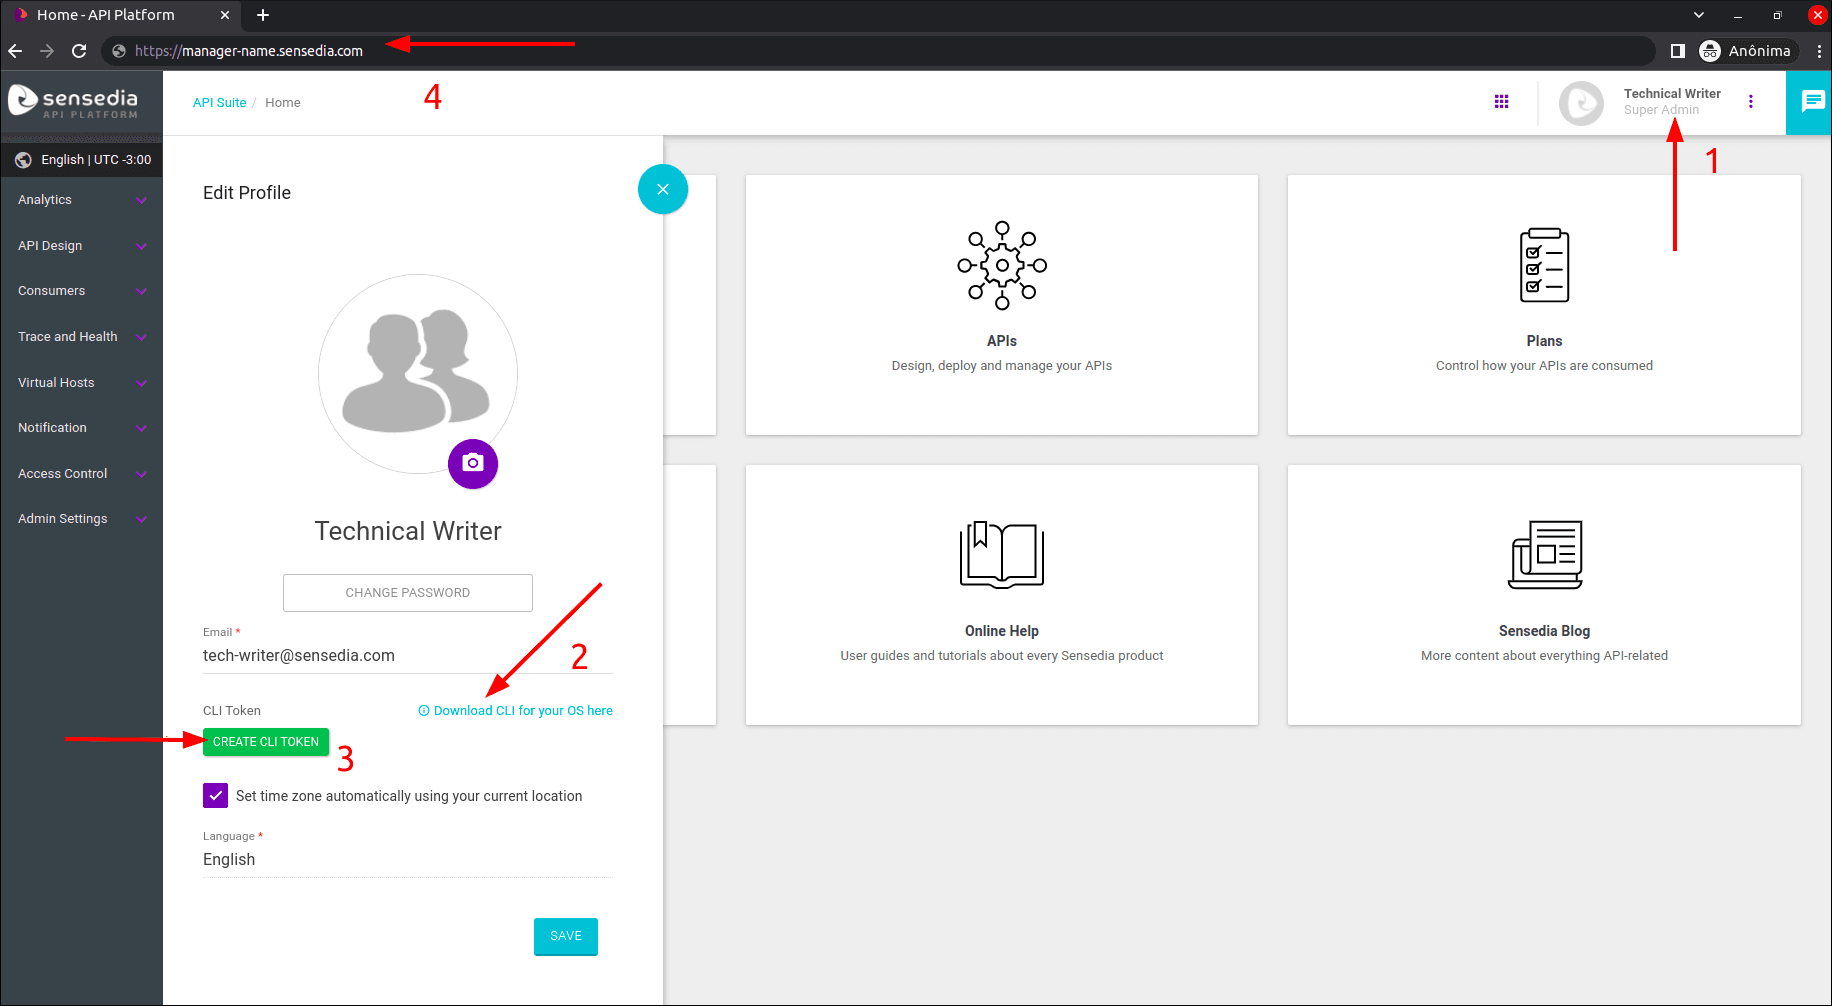
Log into your Sensedia API Platform and click the profile button with your user name on the top-right corner of your screen. The “Edit Profile” menu will be displayed on the left.
Step 2
If you haven't downloaded the binary file yet, you can do so through the button Download CLI for your OS here, located just below the field with your e-mail address. Follow the instructions to choose the file that is compatible with your OS. Read the instructions on this page for more information on installing the binary file.
Step 3
Click on CREATE CLI TOKEN, located just below the download field, to generate the token to be used for authentication.
NOTEAfter creating your CLI token, keep it safe in a place you can easily access whenever necessary. Remember that after you close the “Edit profile” menu, as a safety measure, your token number will be hidden by password masking, and you will not be able to display it again.
Step 4
While configuring Sensedia CLI, you will also need to use your manager URL sent by the Sensedia team. Learn How to Configure Sensedia CLI.
Obtaining authentication credentials for API Management (Sensedia Platform)
NOTESupport for API Management (Sensedia Platform) is available from Sensedia CLI version 2.11.0 onwards.
Step 1
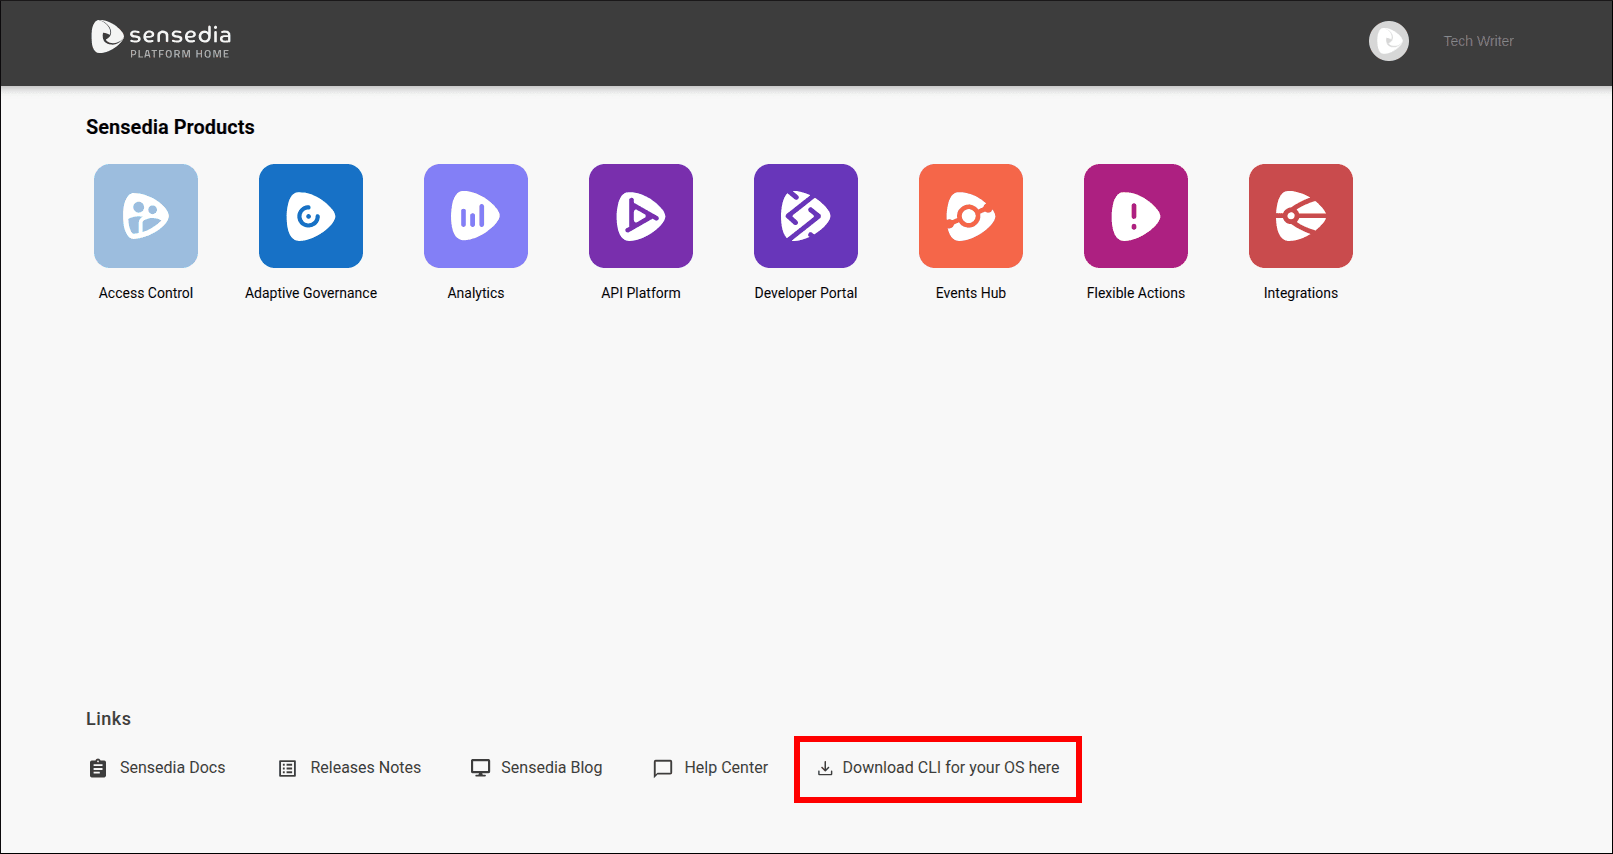
If you haven't downloaded the binary file yet, you can do so through the button Download CLI for your OS here, located at the bottom of your Platform's home screen:
Step 2
Follow this procedure to generate your credentials (Client ID and Client Secret) from Sensedia Access Control.
Installing the Binary File
Once the binary file is downloaded, you’ll only need a few steps to complete the installation:
Open a terminal window in the folder where the Sensedia CLI binary file is located and type the following command that allows the file to run:
Then, this file will need to be moved, so it can be run in any folder where a terminal window is open. In order to do so, run the following command:
Now, your Sensedia CLI is ready to be used!
How to Configure Sensedia CLI
Open a terminal window and run the command ssd configure. The interactive mode will be activated and it will ask you the complete the following:
- What is the URL of your API Platform?
- Enter your organization’s API Platform (URL) address. E.g.: “https://manager-name.sensedia.com”
NOTERemember to substitute the address “https://manager-name.sensedia.com” with your manager URL sent by the Sensedia team.
- Please provide your Sensedia CLI Token:
- Enter your authentication credentials.
- Choose a default output for the CLI:
- Here you should use the keyboard arrows to choose the file type you prefer.
- Choose the product you want to use the CLI with.
- Again, you should use the keyboard arrows to choose the product you want to use with the CLI.
A success message will appear after you complete these steps.
Getting help
You can get help directly from Sensedia CLI by typing:
By running Sensedia CLI without specifying any command, as shown above, you can see a list of all available commands.
You can also get help for a specific command by passing the flags -h or --help to the command.
The following example shows how to get help for the create command:
This help mode provides a description of the operation the command performs and displays the flags that can be used with it.
The create command must be followed by a subcommand, as indicated in the following snippet of the help text:
By passing the help flag as shown above, you can also see a list of the subcommands available for that command.
It is also possible to get help for a specific subcommand, through the flags -h or --help:
The example above displays help for the create api command.
Usage modes
Sensedia CLI supports three usage modes: direct mode (flags), interactive mode and declarative mode.
In the direct mode, you enter the command completely, that is, including its flags and respective arguments on the same line, and then press the Enter key to execute it. Example:
However, if you just type ssd followed by a command without flags and arguments and press the Enter key, the interactive mode will be activated.
In this mode, questions are presented in sequence so that you can specify each argument of the required flags one by one.
To run the create api command through the interactive mode, for example, just type:
When pressing the Enter key, the following questions will be presented in sequence:
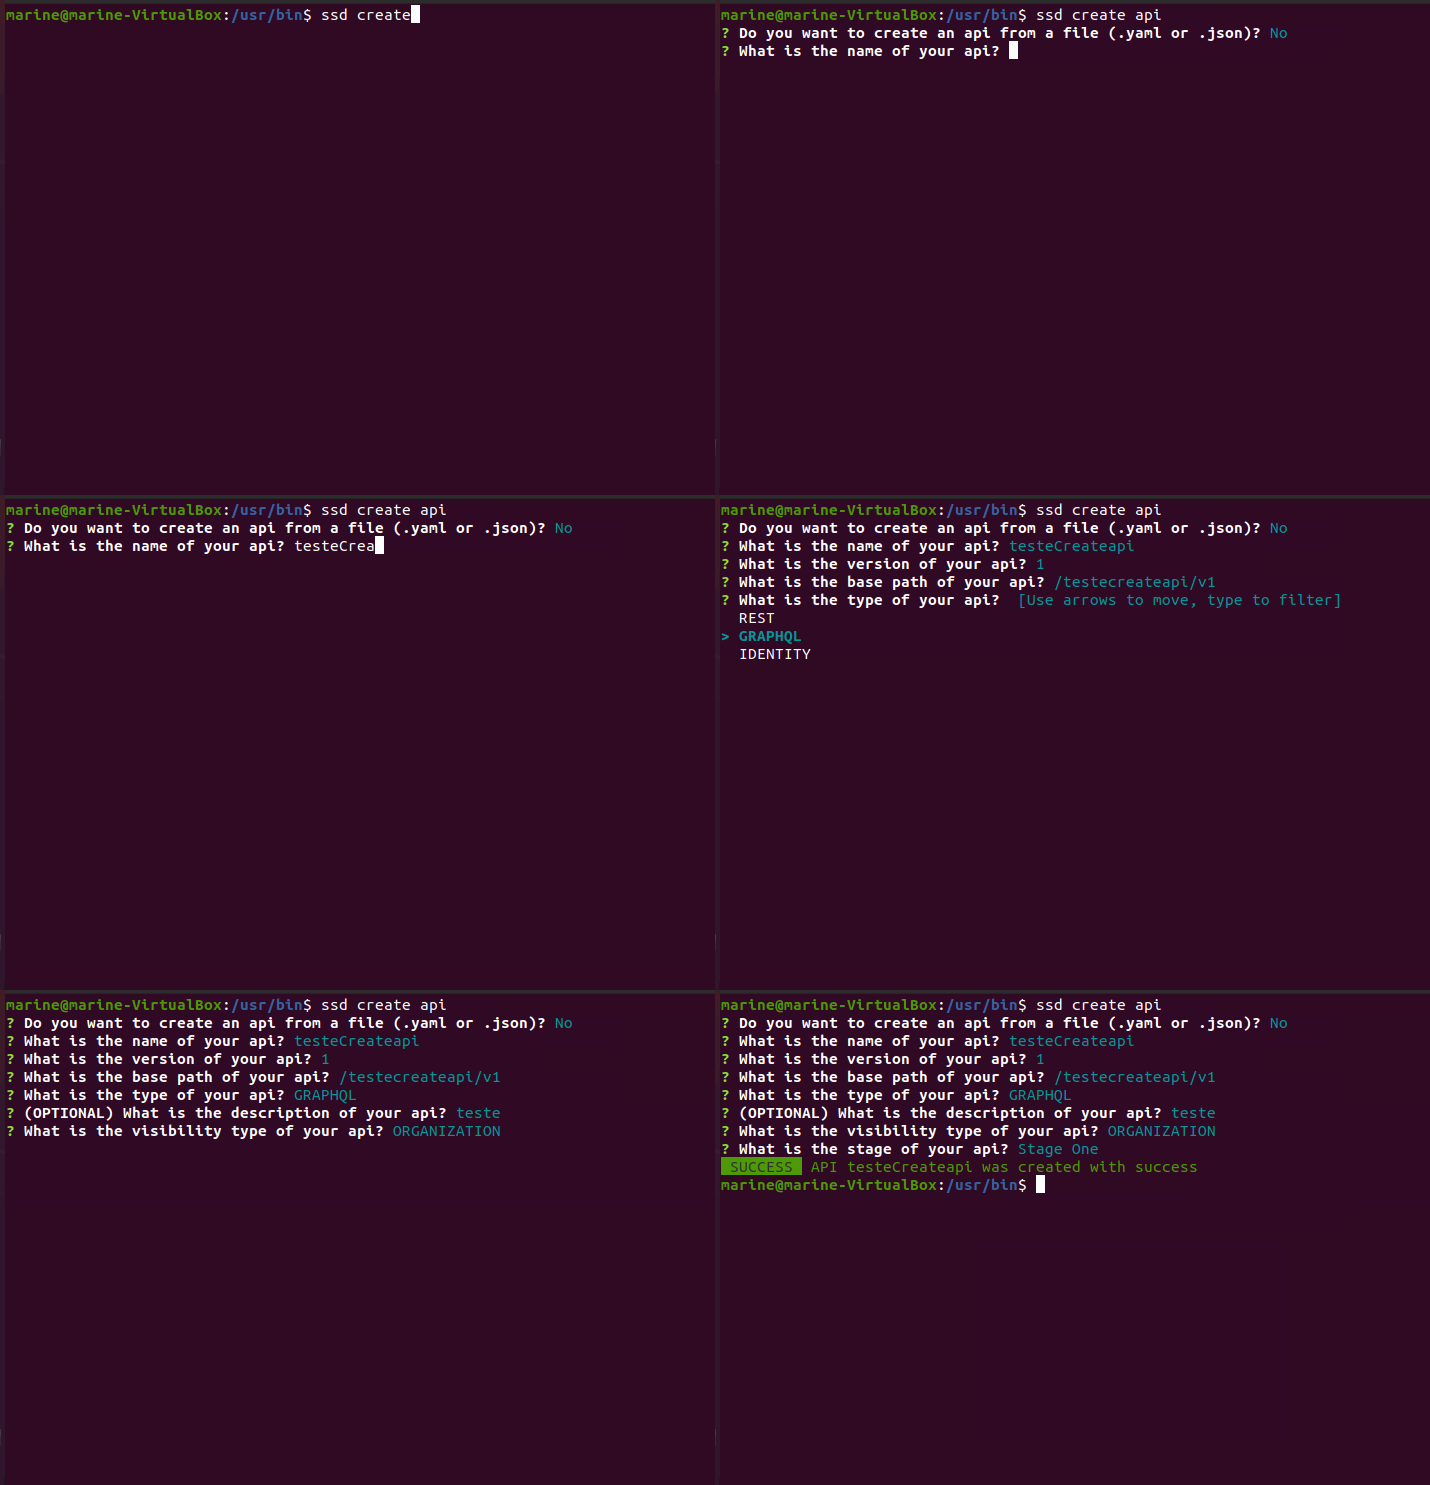
For each question, specify the argument and press Enter.
Questions corresponding to optional flags are indicated by the expression (OPTIONAL) before the question.
Such questions can be skipped.
Suggested arguments are indicated in parentheses after the question.
To opt for the suggested argument, simply press the Enter key on your keyboard.
Some questions present the possible arguments as options to be selected.
Use the arrow keys on your keyboard to select the option you want and press Enter.
You can also type a part of the desired option to filter it.
NOTEThe interactive mode will only be enabled if no flag is specified at all.
If you choose to use the direct mode, you must specify all the required flags for the command. Otherwise, an error will be returned and the operation will not be executed.
In the declarative mode, you can manage resources using .yaml files, eliminating the need to pass commands with flags or answer questions in interactive mode.
This mode focuses on the desired outcome rather than the steps required to achieve it.
This allows you to describe the resources you want to create, modify, or delete in a single file.
Version
You can check the version of Sensedia CLI you are running by typing: