---
title: SAML 2.0
description: Establish connections with SAML 2.0
documentId: access-control-saml2
locale: en-US
---
It is possible to establish a SAML connection with an identity provider so that users can log into Sensedia products using that provider's credentials.
The chosen provider must support the SAML 2.0 standard.
- It is not possible to generate *Client Credentials* using federated logins.
- Each environment allows **only one** active federated login provider at a time.
If there is already a provider with **Active** status, it will not be possible to activate or create another provider.
To configure a new provider, first deactivate the active provider. Once the status has been changed, the creation or activation of another provider will be permitted.
When you delete a federated login provider:
- Users **originally created as local users** in Access Control regain access via login and password, after a password reset.
- Users **created exclusively through federated login**, who were never local users, are permanently deleted, automatically and without prior notice. This data cannot be recovered after deletion.
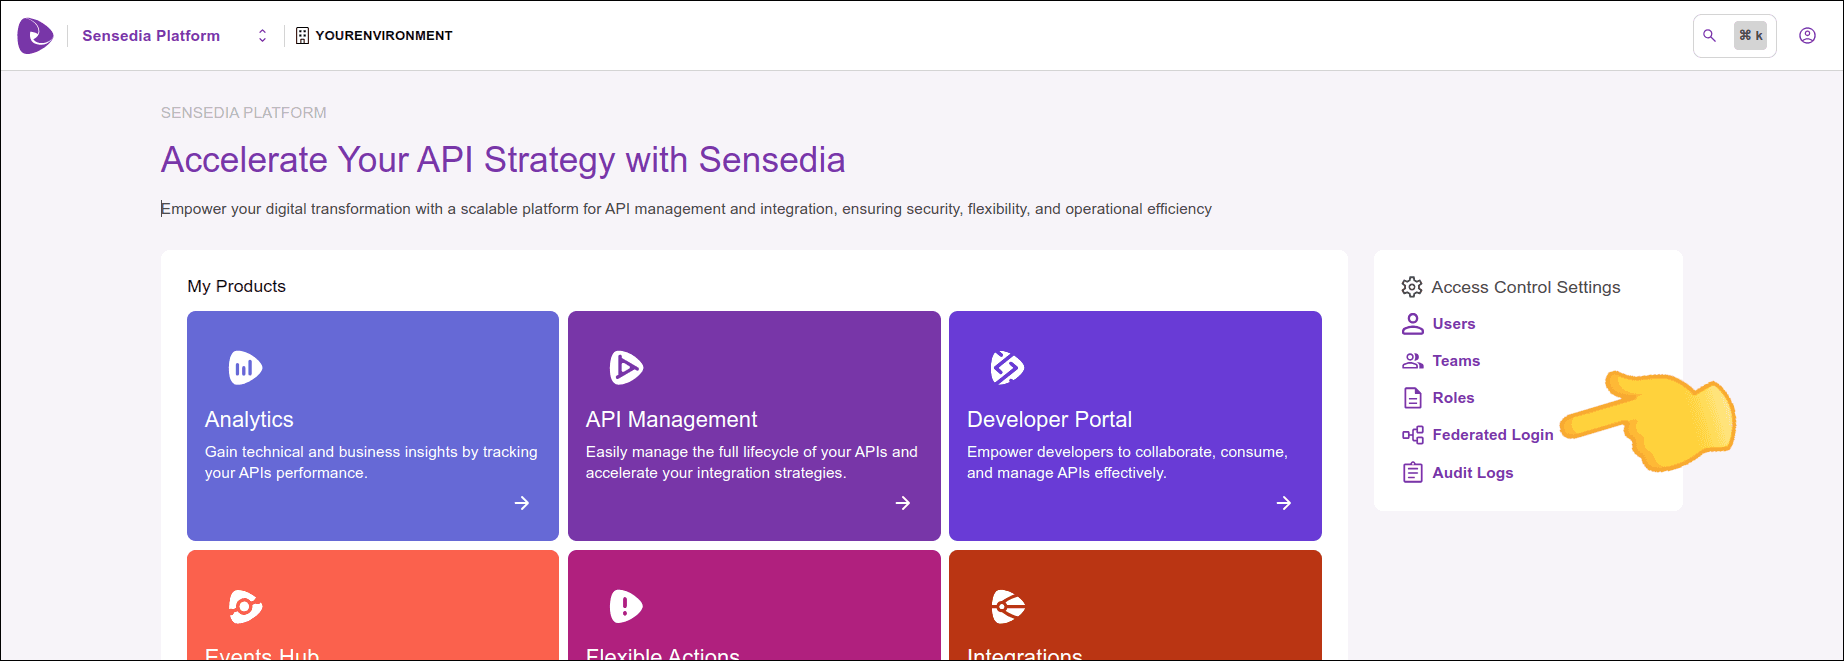
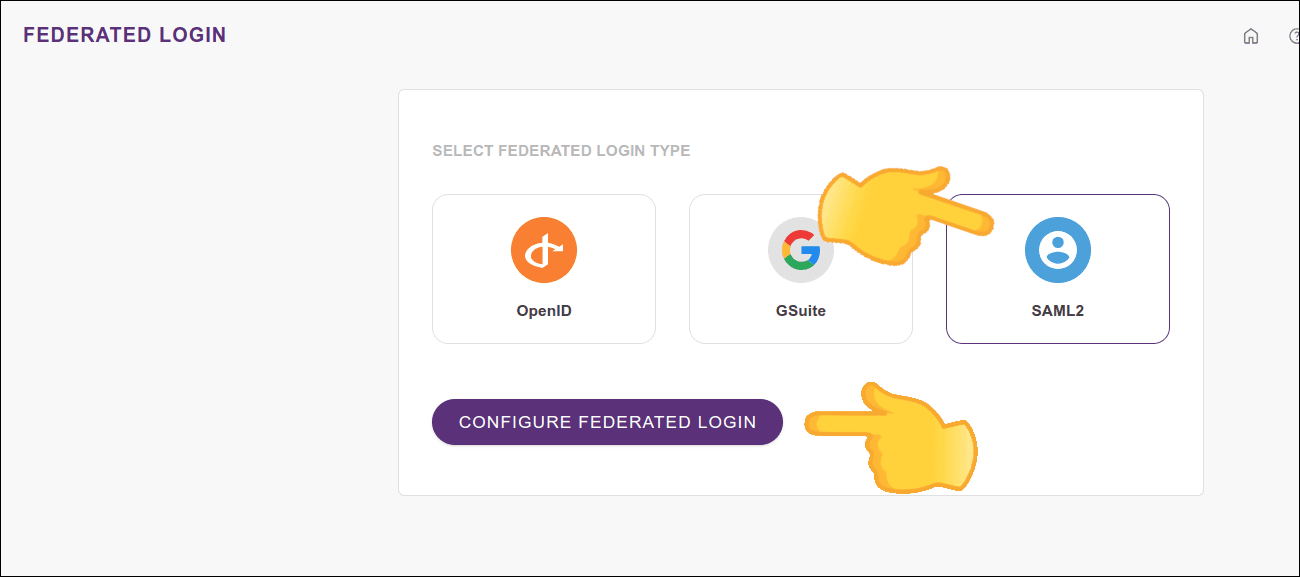
## Configuring a SAML 2.0 connection
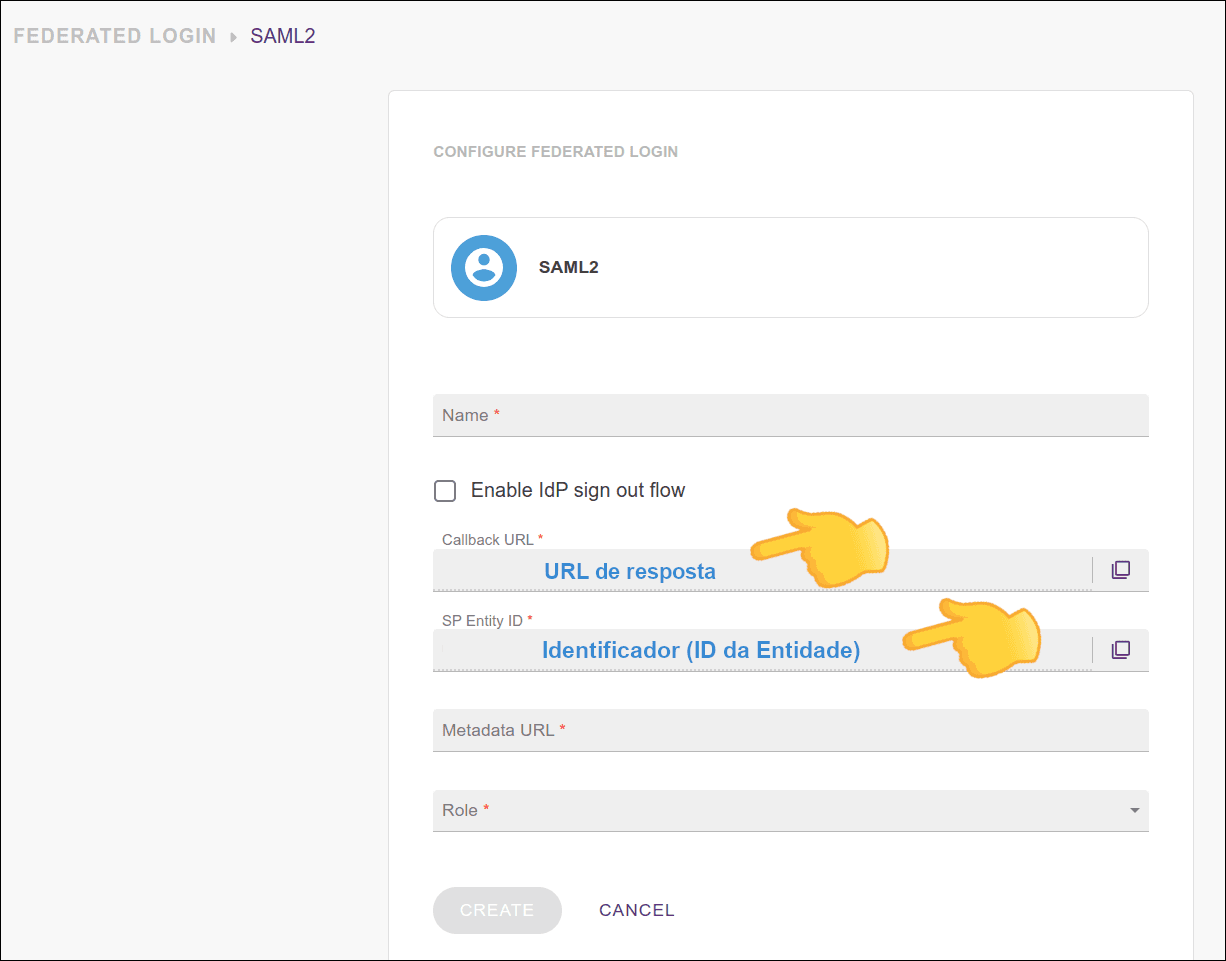
Configuring a connection with an identity provider involves the following elements:
- **Name**: name of your SAML provider.
- **Enable IdP sign out flow**: Enable IdP sign out flow.
If you want the user to also be logged out of the SAML identity provider when logging out, select this option and configure your IdP with the information shown in the two fields that will be displayed:
- **Logout URL** (integration logout URL) and
- **Signing certificate**.
- **Callback URL**: the URL to which your identity provider should return the user after authentication;
- **SP Entity ID**: this is how your provider will identify your entity.
Configure your identity provider with this URN.
- **Metadata URL**: address for accessing metadata.
Check your identity provider's documentation to locate the metadata URL and enter it in this field.
- **Role**: select the role to be applied with this access.
If there are roles configured on your identity provider side, they will prevail over this one.
The fields are explained in the video below:
[Explanatory video about SAML 2.0 configuration](https://www.youtube.com/watch?v=nbr34H2nuQ)
## Editing or deleting a SAML 2.0 connection
Once active, the connection with the identity provider can be updated at any time.
To do this, click on any field you want to edit, make the necessary changes and click **UPDATE**.
To delete a connection, click the **Delete Login** button.
- When you click **Delete Login**, the federated login provider is deleted. Users originally created as local users in Access Control regain access via login and password after a password reset; users created exclusively through federated login are permanently deleted. See the details at the top of this page.
- To re-establish the connection, follow the steps above again (Configuring a SAML 2.0 connection).
- Clicking **Delete Login** does not change your settings with your identity provider.
## Login and user control
Unlike what happened with login through the Sensedia Platform, now login with username and password continues to be possible even after configuring SAML 2.0.
A user will be able to log into Sensedia products both via SAML and separately.
## Configuring an API Manager application in your identity provider
To enable a SAML 2.0 connection, an API Manager application must be registered in your identity provider.
See below some **examples** of configuration using:
- [Okta](#saml2-okta)
- [Azure AD](#saml2-azure)
Consult your provider's official documentation for more help with the necessary configurations.
### Example configuration using Okta
The SAML 2.0 connection can be made with the access provider of your choice.
There are several providers, one of them is **Okta**.
To configure it, follow the steps listed below.
**Create an Okta account**
If you don't already have one, create an Okta account.
Access via the link: [https://developer.okta.com/signup/](https://developer.okta.com/signup/)
**Create a SAML 2.0 type app**
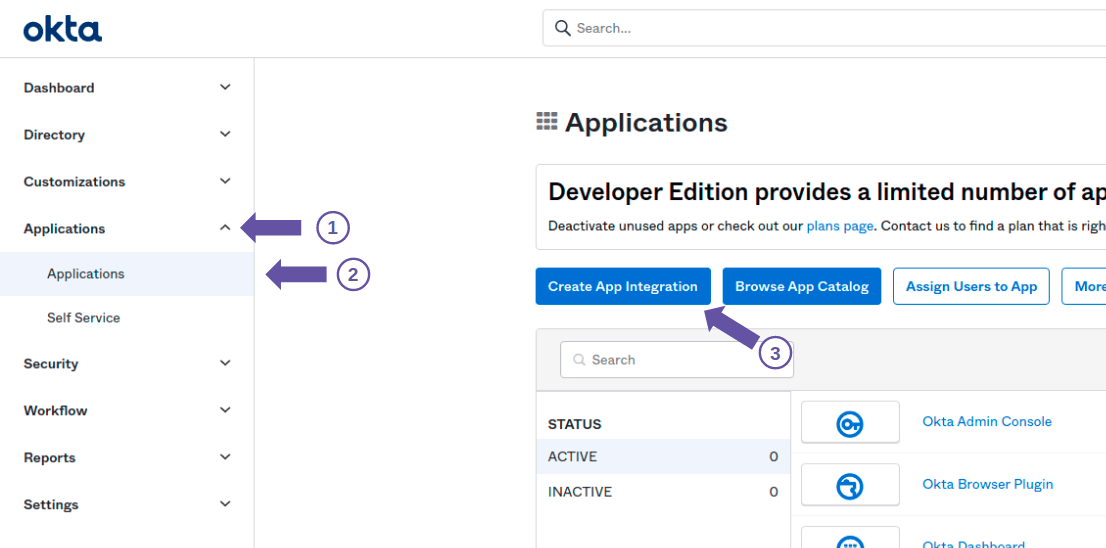
To do this, click **Applications > Applications** and the **Create App Integration** button, as shown in the figure below.
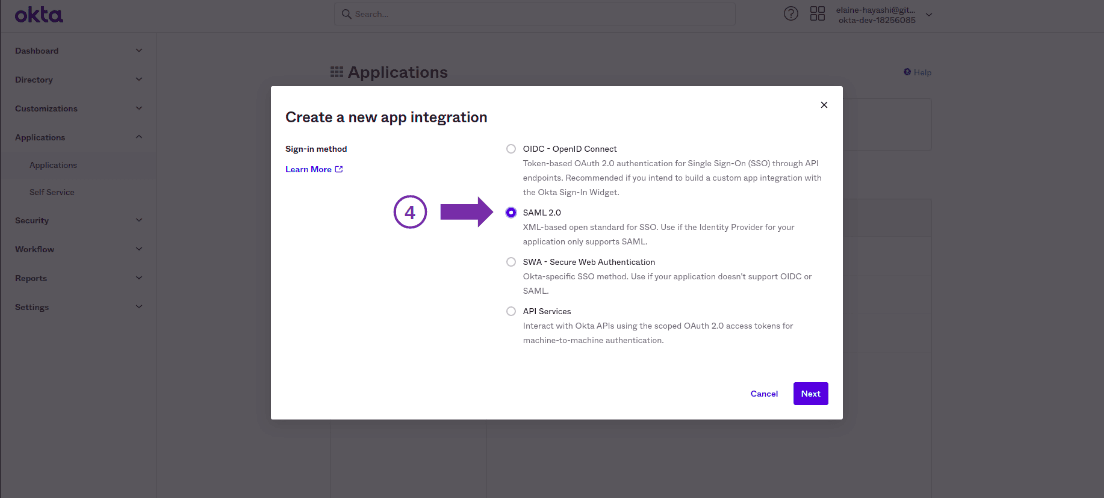
Then, in the modal screen that opens, select the SAML 2.0 option and click **Next**
**Configure the app**
Configure the app, specifying a name for the federated login, icon or logo (optional) and visibility options.
Then click **Next**.
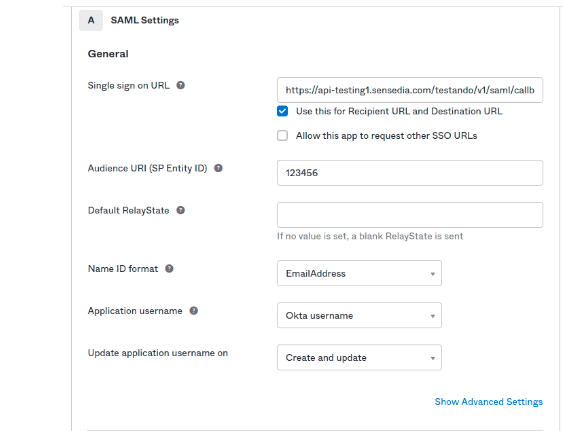
**Fill in the configuration fields**
On the next screen, fill in the fields:
- **Single sign on URL**: Callback URL, which is based on your API Manager address: `/api-manager/api/v3/saml/callback`
- **Audience URI (SP Entity ID)**: the value entered in this field will be used in API Manager as "application ID"
- **Default RelayState**: non-mandatory field
- **Name ID format**: select **EmailAddress**
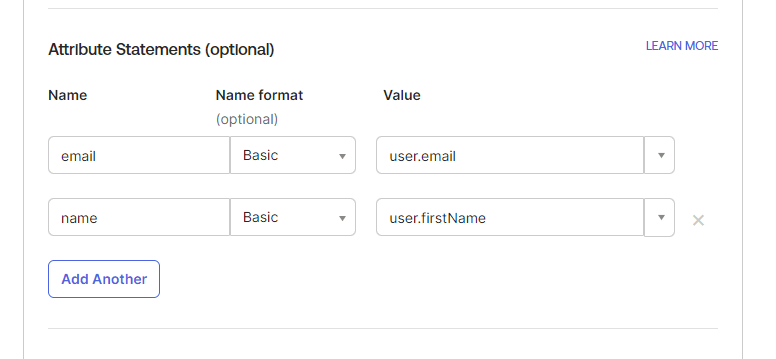
Further down, in **Attribute Statements**, fill in:
- **Name**: `email`
- **Format**: `Basic`
- **Value**: `user.email`
- **Name**: `name`
- **Format**: `Basic`
- **Value**: `user.firstName`
Then click **NEXT** to finish the registration.
**Export the metadata**
On the screen that appears when you click **NEXT**, export the metadata by clicking "Identity Provider metadata is available if this application supports dynamic configuration", identified in the following image.
(If the screen doesn't appear, go back to **Applications > Applications** and click on the name of the application you just created. On the next screen, click the **Sign On** tab. You should see the screen below)
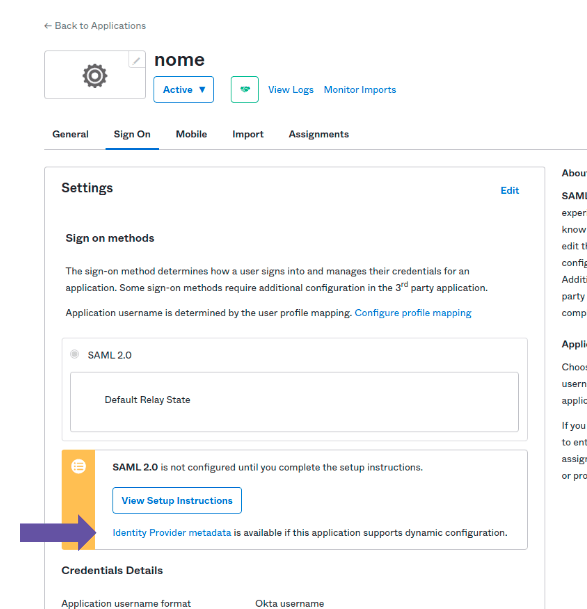
The screen that opens will show the content, which can be saved as metadata.xml.
Note the URL. It will be used to configure API Manager.
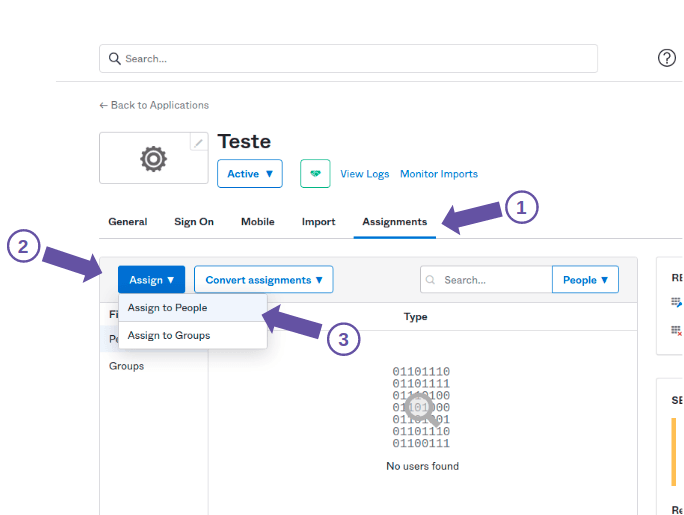
**Link the Okta user to the created app**
To do this, click the **Assignments** tab and then click **Assign > Assign to People**, as illustrated in the image below.
On the screen that opens, click **Assign** next to your name and email, as illustrated in the image below.
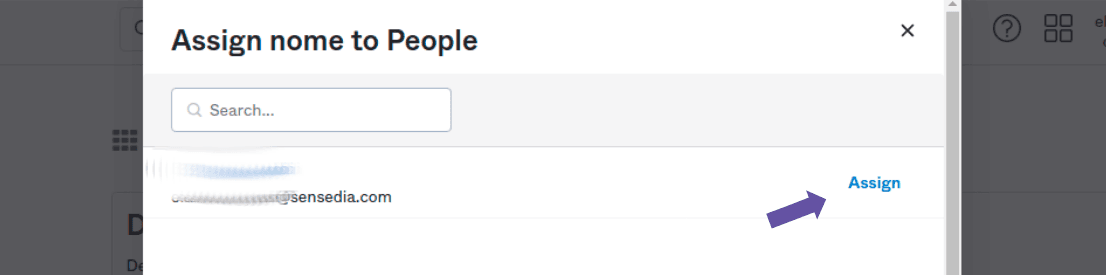
On the next screen, click the **Save and Go Back** button.
The user must be linked to the created app for them to be able to log in.
**Configure API Manager**
After configuring Okta, enter your API Manager.
Go back to the beginning of this page for more details on [configuring an integration](#config-plat) in API Manager.
In summary, in **Access Control > Integrations**, fill in the fields:
- **Name**: name you registered in step 3
- **SP Entity ID**: name entered as *Audience URI* in step 4
- **Metadata URL**: enter the URL you obtained in step 5
Click **CONNECT**
### Example configuration using Azure AD
To configure Azure AD as an identity provider, follow these steps:
[Create a Client](#criate-client)
[Configure SAML](#configure-saml)
Note the [Metadata URL](#access-control-azure) to [configure your Sensedia platform](#access-control-azure)
#### 1. Create a Client
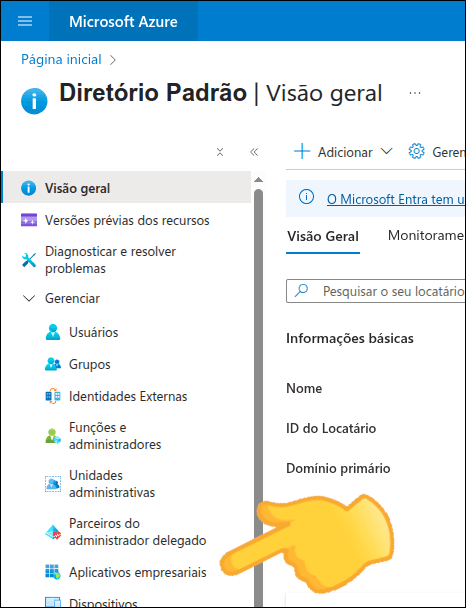
**Access Microsoft Entra ID**
Access your Microsoft Azure account and click **Microsoft Entra ID**.

**Access Enterprise Applications**
Click **Enterprise Applications**.
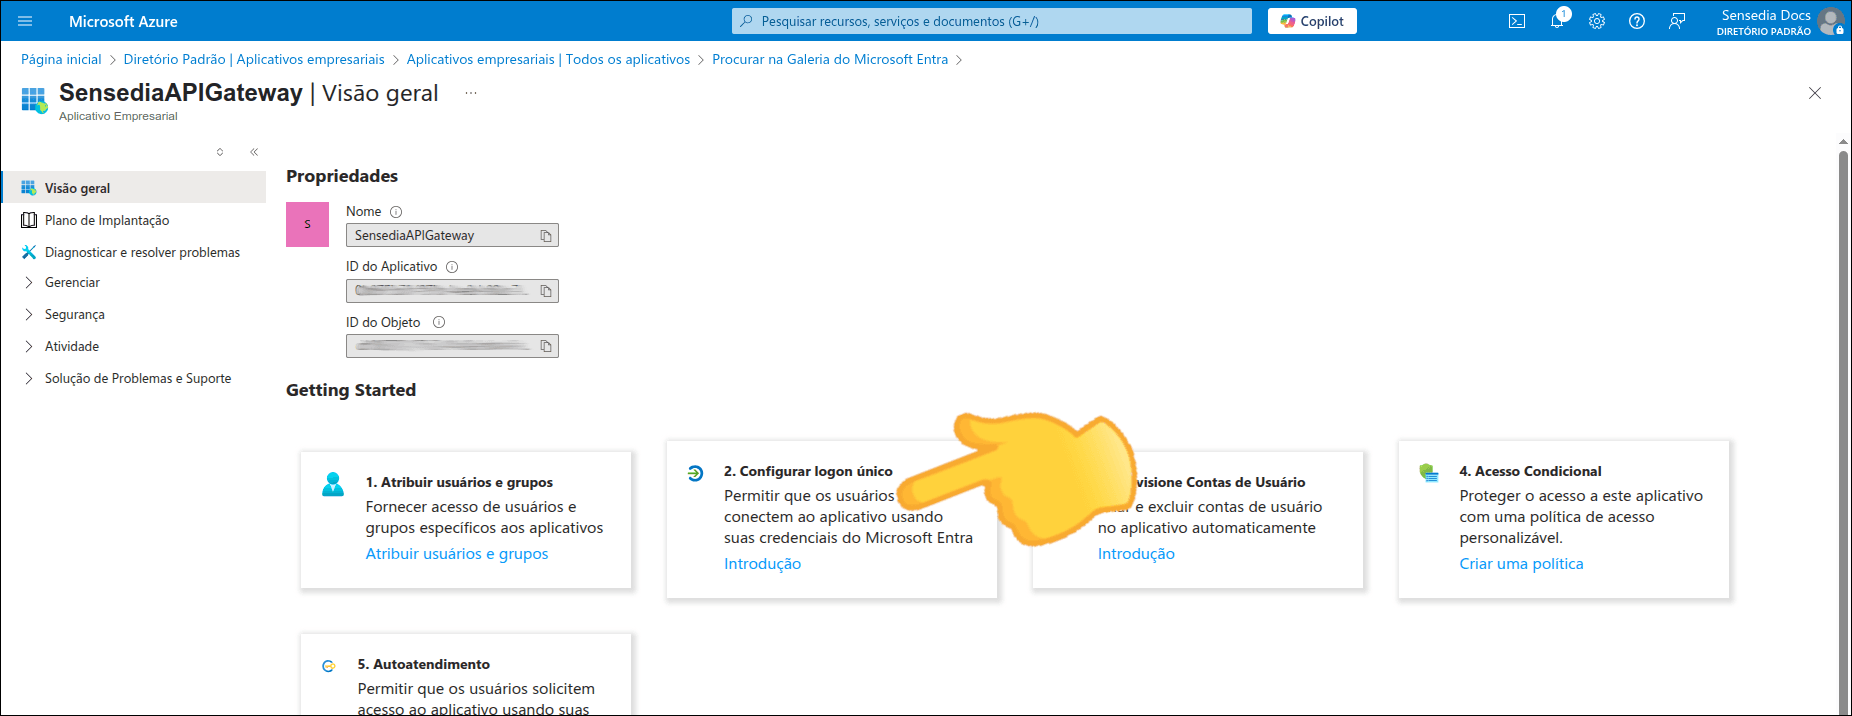
**Create a new application**
If you already have an application created for API Manager, go to [step 2 - Configure SAML](#configure-saml).
Otherwise, click **New application**.
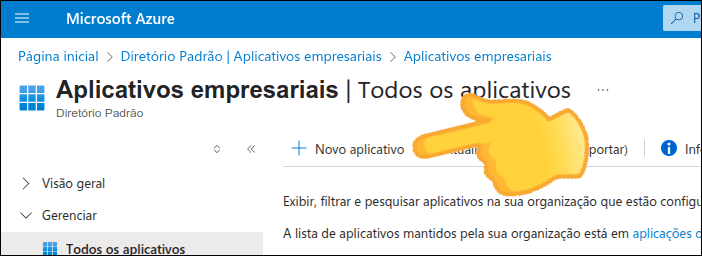
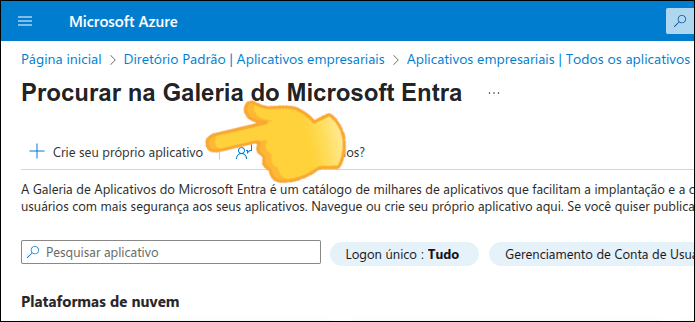
**Create your own application**
Click **Create your own application**.
**Configure the application**
Enter:
- The name you want to give your application
- The purpose of use of your application: select "Integrate any other application that you don't find in the gallery"
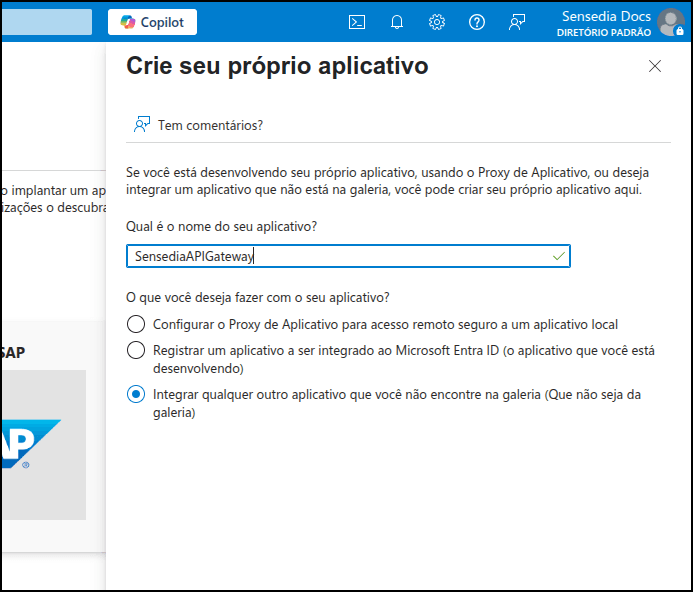
**Finalize creation**
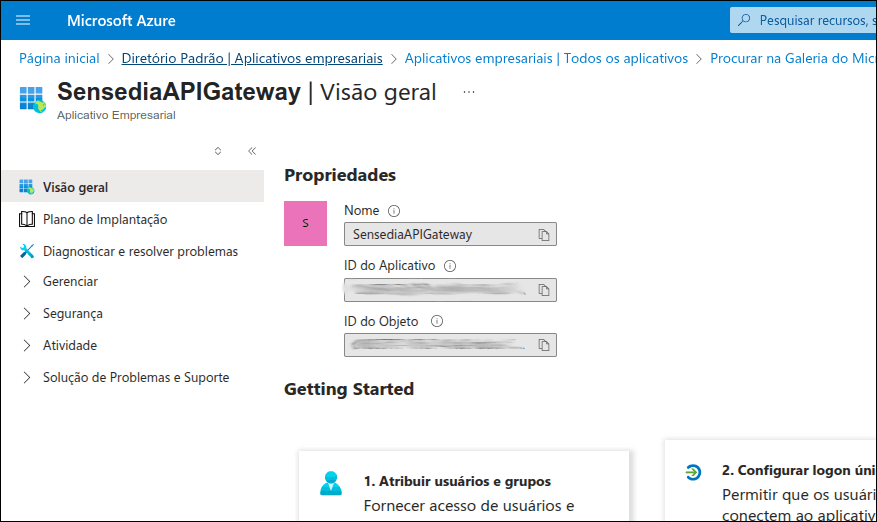
Click **Create**.
You will see your application properties, including its ID and object ID.
#### 2. Configure SAML
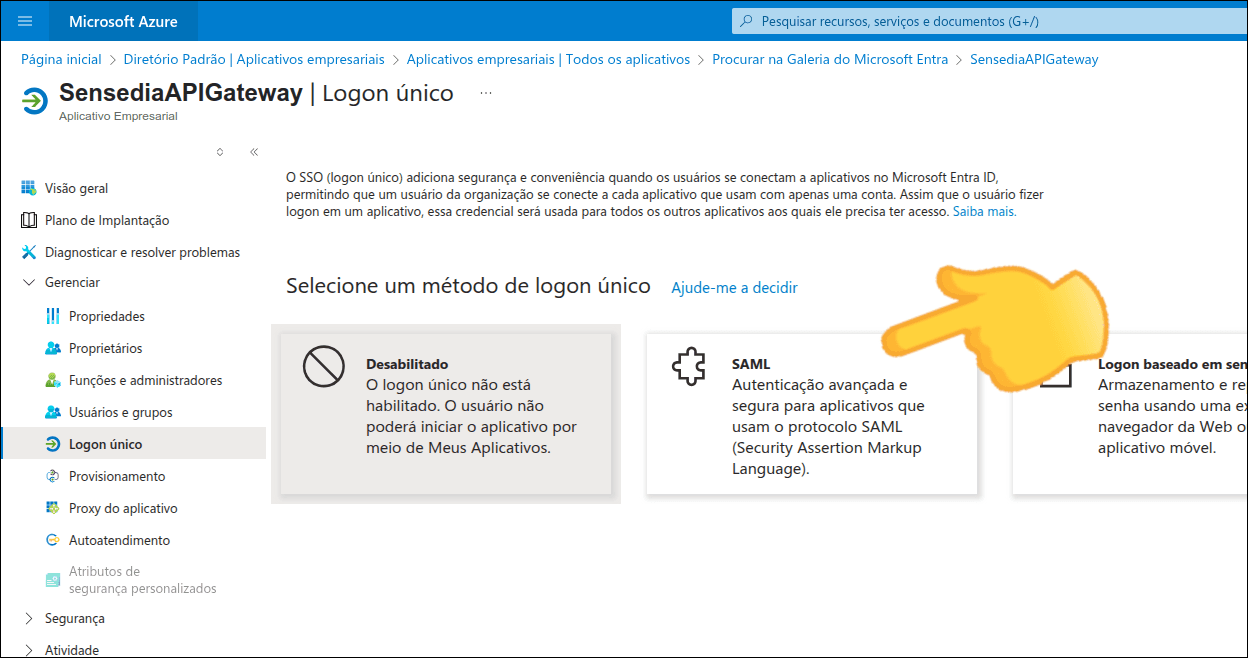
**Configure single sign-on**
After creating the application, still on the Overview screen, click **Configure single sign-on**.
**Select SAML**
Click **SAML**.
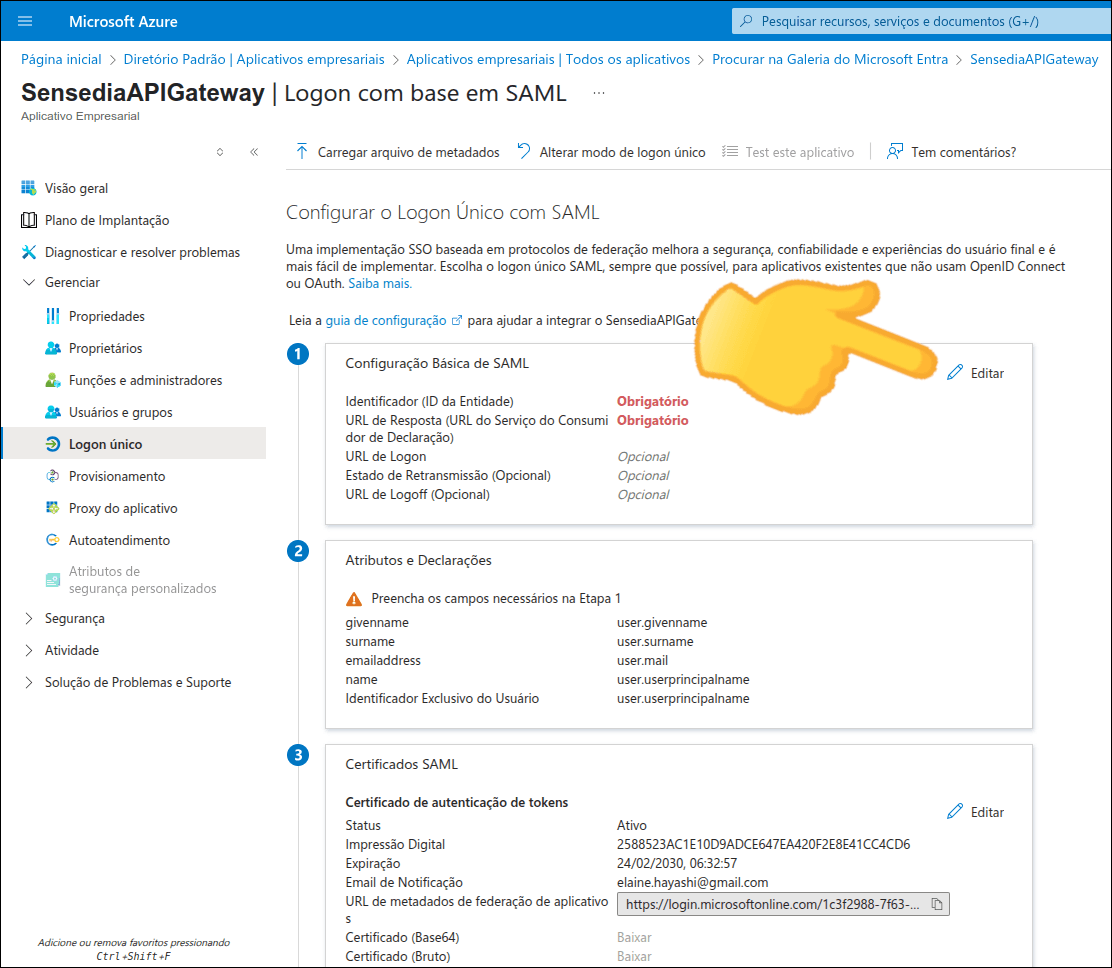
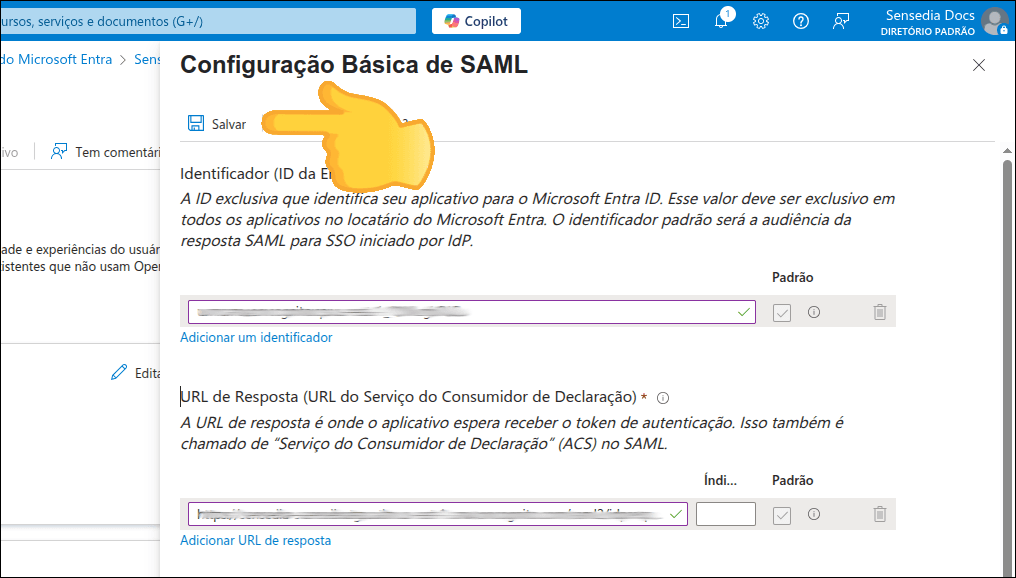
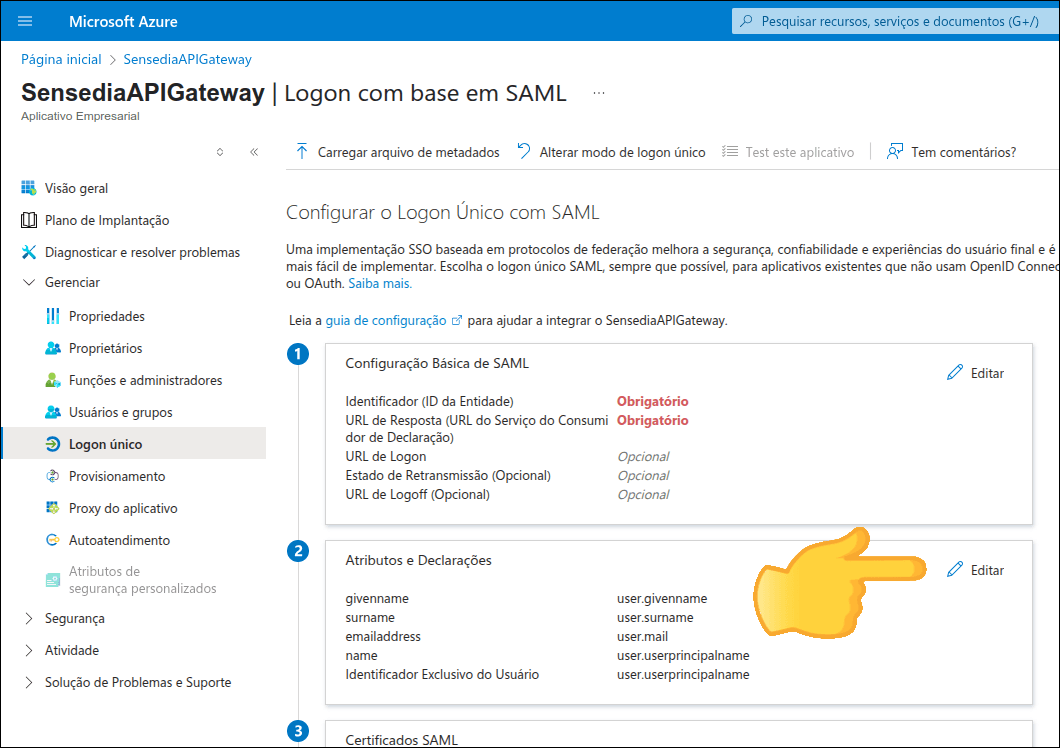
**Edit basic SAML configuration**
If you're configuring for the first time, the **Configure Single Sign-On with SAML** screen will appear as shown in the image below.
Click **Edit** in the "Basic SAML Configuration" section.
**Fill in the required fields**
Fill in the fields:
- **Identifier (Entity ID)**: Enter the *SP Entity ID*
- **Reply URL (Assertion Consumer Service URL)**: Enter the *Callback URL*
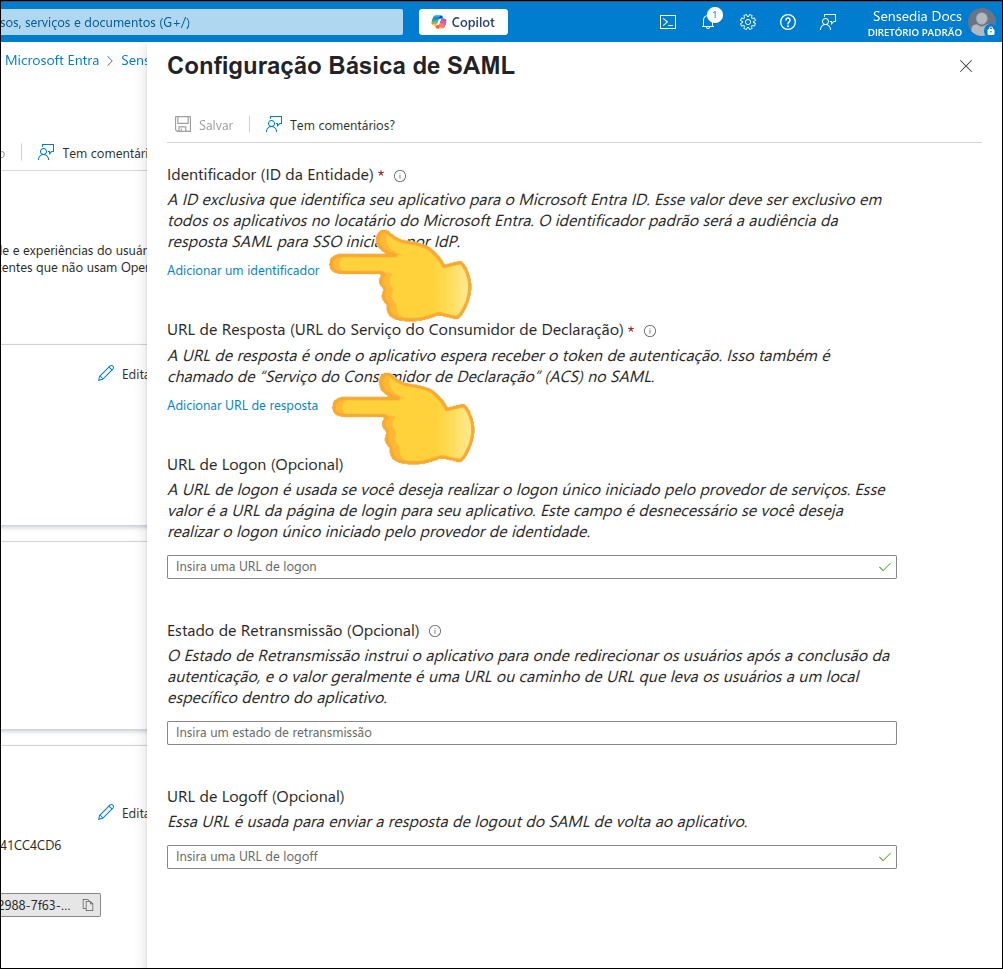
The Identifier and Reply URL can be obtained from:
- Access Control Settings > Federated Login
- Click SAML2 and the **CONFIGURE FEDERATED LOGIN** button (the button will be enabled when you click SAML2)
**Save settings**
Click **SAVE** to save the settings.
**Edit attributes and claims**
Click **Edit** in the "Attributes and Claims" section.
**Remove unnecessary attributes**
Next to *user.givenname* and *user.surname*, click the **...** and **Delete** to remove them and then click **OK** to confirm.
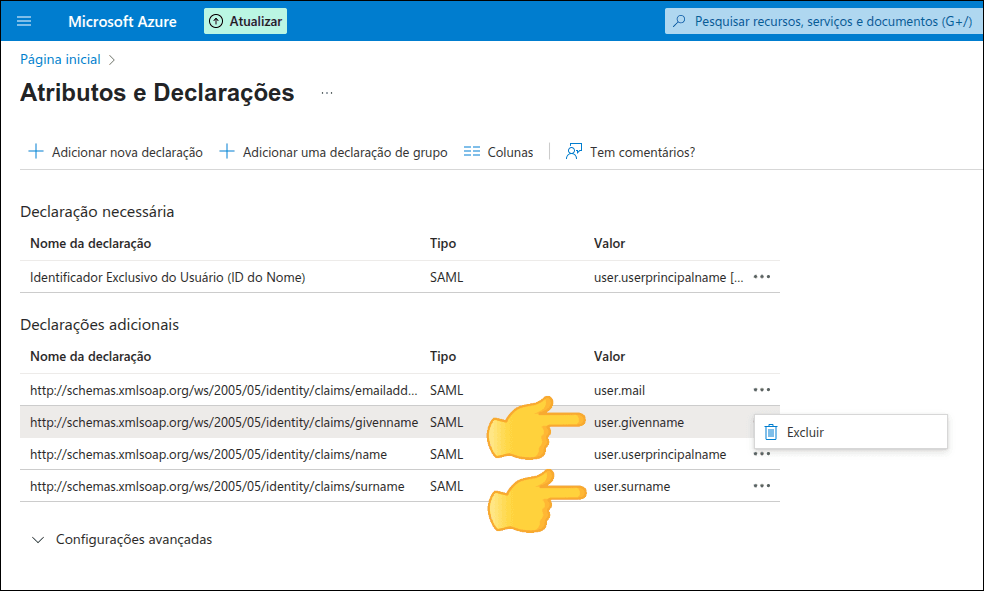
After removing *user.givenname* and *user.surname*, only the *email*, *name* and *Unique User Identifier* fields should remain.
**Clear namespaces**
The *Namespace* of the fields that will be kept will come filled in. Clear this field.
For example, the *Namespace* of the *email* field comes like this:
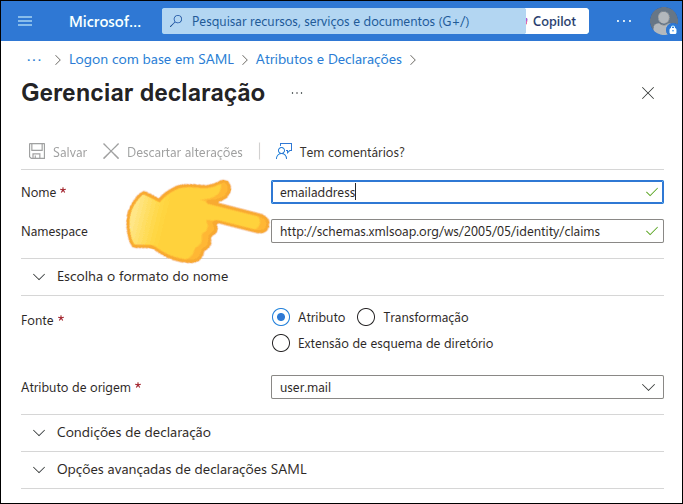
and should be like this:
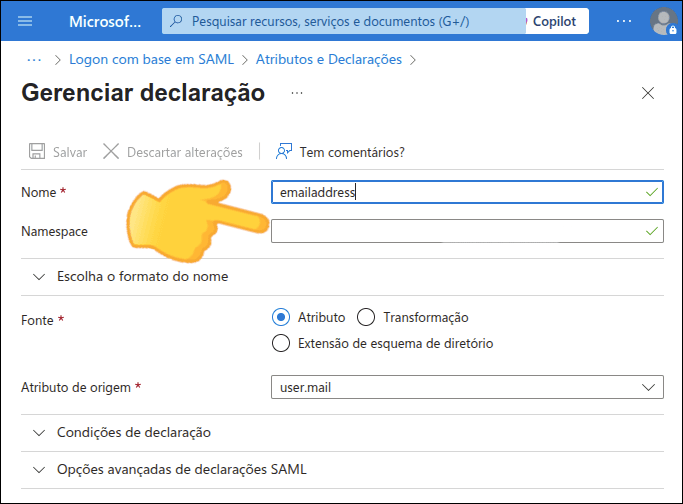
Delete the content of the *Namespace* field for all three: *email*, *name* and *Unique User Identifier*.
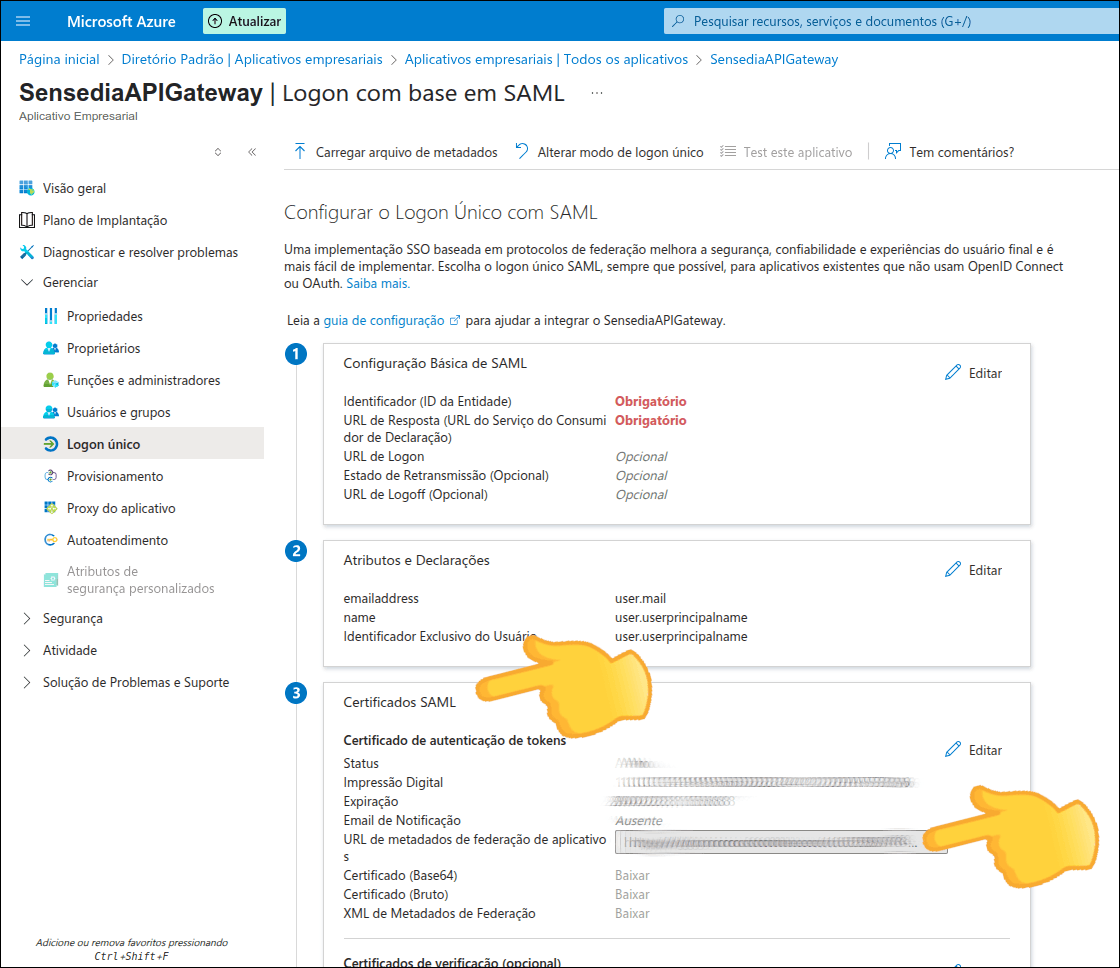
#### 3. Note the Metadata URL
**Copy the metadata URL**
In the "SAML Certificates" section, copy the content of the *App Federation Metadata Url* field.
**Configure your Sensedia Platform**
Configure your Sensedia Platform, following the steps below. If necessary, go back to the beginning of this page for more details on [configuring an integration](#config-plat) in API Manager.
- Enter Access Control Settings > Federated Login

- Click SAML2 and the **CONFIGURE FEDERATED LOGIN** button (the button will be enabled when you click SAML2)

Fill in the fields:
- **Name**: enter the same name given when [creating a client](#criate-client)
- **Metadata URL**: enter the URL we just copied from "SAML Certificates"
- **Role**: default role that will be assigned to users when they log in through the integration

- Click **CREATE**