Webhook
Segue abaixo um resumo do fluxo de comunicação entre Developer Portal e webhook durante a solicitação de credenciais:
-
Desenvolvedor se cadastra no Developer Portal.
-
Desenvolvedor vai no menu Apps e cria um novo app AWS (apps do API Manager Sensedia não utilizam webhook).
-
Sistema Developer Portal faz uma requisição HTTP ao webhook, passando as informações do app AWS do desenvolvedor.
-
Webhook, na sua infraestrutura, recebe a requisição, cria as credenciais e retorna na mesma requisição HTTP.
-
Sistema Developer Portal recebe o retorno, grava as credenciais no banco de dados e disponibiliza acesso para o desenvolvedor.
Especificação
|
É de sua responsabilidade implementar o webhook na sua infraestrutura, mas você pode consultar um exemplo de implementação. |
Open API Specification
Para criar o webhook, você deverá implementar este Contrato Open API.
A especificação foi alterada. Foi adicionado o campo customCredentials (opcional), que pode ser udado com API KEY e CLIENT CREDENTIALS.
|
Endpoints
Veja abaixo os endpoints que você deverá implementar e os detalhes de requisição e resposta de cada um deles.
| Ação | Endpoint |
|---|---|
Criar credenciais |
|
Atualizar credenciais |
|
Revogar credenciais |
|
Verificar disponibilidade |
|
Autenticação
Todos os endpoints utilizarão basic authentication.
Você receberá o header Authorization: Basic <username:password base64> e deverá validá-lo da forma que desejar.
Criar credenciais
POST /v1/createCredentials
Endpoint responsável por criar e retornar as credenciais do app.
Request
-
Header:
Authorization: Basic <username:password base64>
-
Body:
{
 "appName": "string",
 "developer": "string",
 "apis": [
   {
     "id": "string",
     "usagePlans": [
       {
         "id": "string"
       }
     ]
   }
 ]
}
Response
-
Status code:
200 OK -
Body:
{
 "credentialType": "CLIENT_CREDENTIALS | API_KEY",
 "clientId": string,
 "clientSecret": string,
 "apiKeyId": string,
 "apiKey": string
}
A resposta pode retornar tanto uma API Key quanto Client Credentials.
Para o credentialType=API_KEY, devem ser retornados os campos apiKeyId e apiKey.
Para o credentialType=CLIENT_CREDENTIALS, devem ser retornados os campos clientId e clientSecret.
A especificação de CreateCredentialsResponse foi alterada. Foi incluído o campo customCredentials (opcional), para retorno de informações adicionais, como API KEY e CLIENT CREDENTIALS.
|
Atualizar credenciais
POST /v1/updateCredentials
Request
-
Header:
Authorization: Basic <username:password base64>
-
Body:
{
 "updatedAt": "2024-03-01T18:58:47.878561013Z[GMT]",
 "appName": "string",
 "developer": "string",
 "credentialType": "CLIENT_CREDENTIALS | API_KEY",
 "clientId": "string",
 "apiKeyId": "string",
 "apis": [
   {
     "id": "58baecsdd4",
     "action": "NONE | ADDED | REMOVED",
     "usagePlans": [
       {
         "id": "3llq7e",
         "action": "NONE | ADDED | REMOVED"
       }
     ]
   }
 ]
}
Response
-
HTTP status:
204 No Content -
Body: vazio
A especificação de UpdateCredentialsRequest foi alterada. Foi incluído o campo customCredentials (opcional), para retorno de informações adicionais, como API KEY e CLIENT CREDENTIALS.
|
Revogar credenciais
POST /v1/revokeCredentials
Endpoint responsável por revogar (efetivamente desativar ou excluir) credenciais do app.
Request
-
Header:
Authorization: Basic <username:password base64>
-
Body:
{
 "appName": "string",
 "developer": "string",
 "credentialType": "CLIENT_CREDENTIALS | API_KEY",
 "clientId": string,
 "clientSecret": string,
 "apiKeyId": string,
 "apiKey": string
}
Response
-
Status code:
204 No Content -
Body: vazio
A especificação de RevokeCredentialsRequest foi alterada. Foi incluído o campo customCredentials (opcional), para retorno de informações adicionais, como API KEY e CLIENT CREDENTIALS.
|
Verificar disponibilidade
GET /v1/health
Endpoint de gerenciamento da aplicação.
Deve retornar 204 No Content caso a requisição seja realizada com sucesso.
Pode retornar outros status codes como 401,500 etc.
Request
-
Header:
Authorization: Basic <username:password base64>
-
Body: vazio
Response
-
Status code:
204 No Content -
Body: vazio
Casos de erro
Caso o webhook retorne algum erro (status code 4xx ou 5xx), o formato esperado da mensagem é:
{
   "timestamp": date-time,
   "status": integer,
   "error": string,
   "messages": [
       string
   ],
   "path": string
}
Exemplo de implementação do webhook
AWS Lambda
Veja abaixo um exemplo de uma Lambda AWS, em python, que implementa todos os endpoints.
|
O código abaixo é apenas uma referência. Você deve alterá-lo conforme suas necessidades de segurança ou regras de negócio. A única obrigatoriedade é seguir o contrato definido na especificação Open API. |
Para fazer o download do modelo, clique aqui.
Criando credenciais
Para criar credenciais, há dois métodos:
API Keys
As API Keys são geradas com o nome do app do Developer Portal e o e-mail do desenvolvedor que criou o app.
Veja o exemplo abaixo:
 def create_api_key(request_body):
    """Creates a new API Key and associates it with the requested Usage Plans. Return the API Key ID and value."""
    client = boto3.client("apigateway")

    app_slug = request_body.get("appSlug")
    developer = request_body.get("developer")
    apis = request_body.get("apis", [])

    try:
        api_key_response = client.create_api_key(
            name=create_credential_name(app_slug, developer),
            enabled=True,
            # tags={'string':'string'} can be used to distinct API Key created by the webhook
        )

        api_key_id = api_key_response["id"]
        api_key_value = api_key_response["value"]

        # Iterate over APIs in the request body
        for api_data in apis:
            # api_id = api_data.get('id') can be used to verify if API is still related to the Usage Plan
            usage_plans = api_data.get("usagePlans", [])

            # Iterate over usage plans for each API
            for usage_plan in usage_plans:
                usage_plan_id = usage_plan.get("id")

                # Associate API Key with Usage Plan
                client.create_usage_plan_key(
                    usagePlanId=usage_plan_id, keyId=api_key_id, keyType="API_KEY"
                )

        return {
            "statusCode": 200,
            "body": json.dumps(
                {
                    "credentialType": "API_KEY",
                    "apiKeyId": api_key_id,
                    "apiKey": api_key_value,
                    "customCredentials": {
                        "qaautomation-token-1": "qaautomationtoken1",
                        "qaautomation-token-2": "qaautomationtoken2",
                        "qaautomation-token-3": "qaautomationtoken3",
                        "qaautomation-token-4": "qaautomationtoken4",
                        "qaautomation-token-5": "qaautomationtoken5"
                    },

                }
            ),
        }
    except Exception as e:
        logger.error("create_api_key error: %s", str(e))
        return handle_error(str(e))
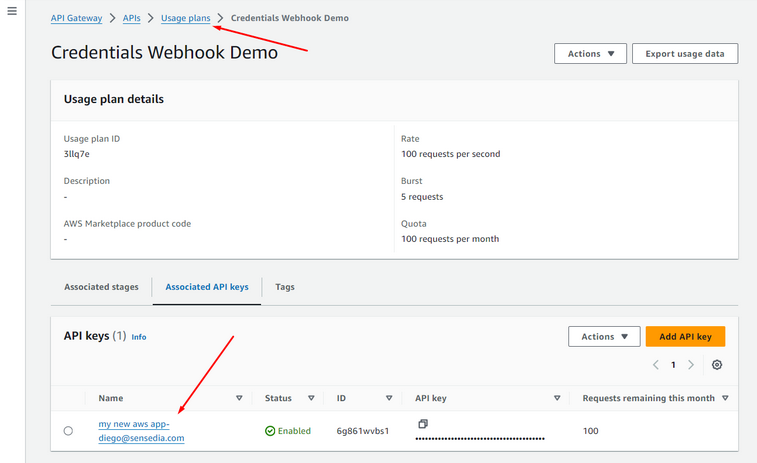
Esse método deve gerar uma nova chave no console da AWS:

E associá-la ao Usage Plans:

Client Credentials
As Client Credentials são configuradas pelo App Clients de um Cognito User Pool.
Veja o exemplo abaixo:
 def create_cognito_app_client(request_body):
    """Creates a Cognito app client and returns the client id and client secret."""
    cognito_client = boto3.client("cognito-idp")
    app_slug = request_body.get("appSlug")
    developer = request_body.get("developer")

    try:
        response = cognito_client.create_user_pool_client(
            UserPoolId=USER_POOL_ID,
            ClientName=create_credential_name(app_slug, developer),
            GenerateSecret=True,
            AllowedOAuthFlowsUserPoolClient=True,
            AllowedOAuthScopes=OAUTH_CUSTOM_SCOPES,
            AllowedOAuthFlows=["client_credentials"],
            SupportedIdentityProviders=["COGNITO"],
        )

        app_client_id = response["UserPoolClient"]["ClientId"]
        app_client_secret = response["UserPoolClient"]["ClientSecret"]

        return {
            "statusCode": 200,
            "body": json.dumps(
                {
                    "credentialType": "CLIENT_CREDENTIALS",
                    "clientId": app_client_id,
                    "clientSecret": app_client_secret,
                }
            ),
        }
    except Exception as e:
        logger.error("create_user_pool_client error: %s", str(e))
        return handle_error(str(e))
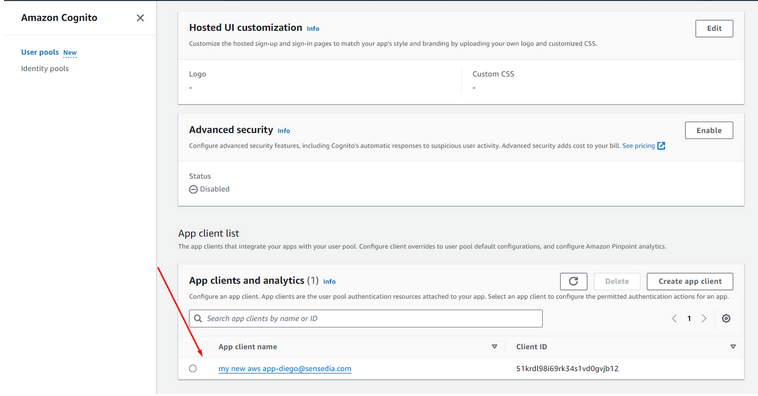
Esse método deverá criar um novo App Client:

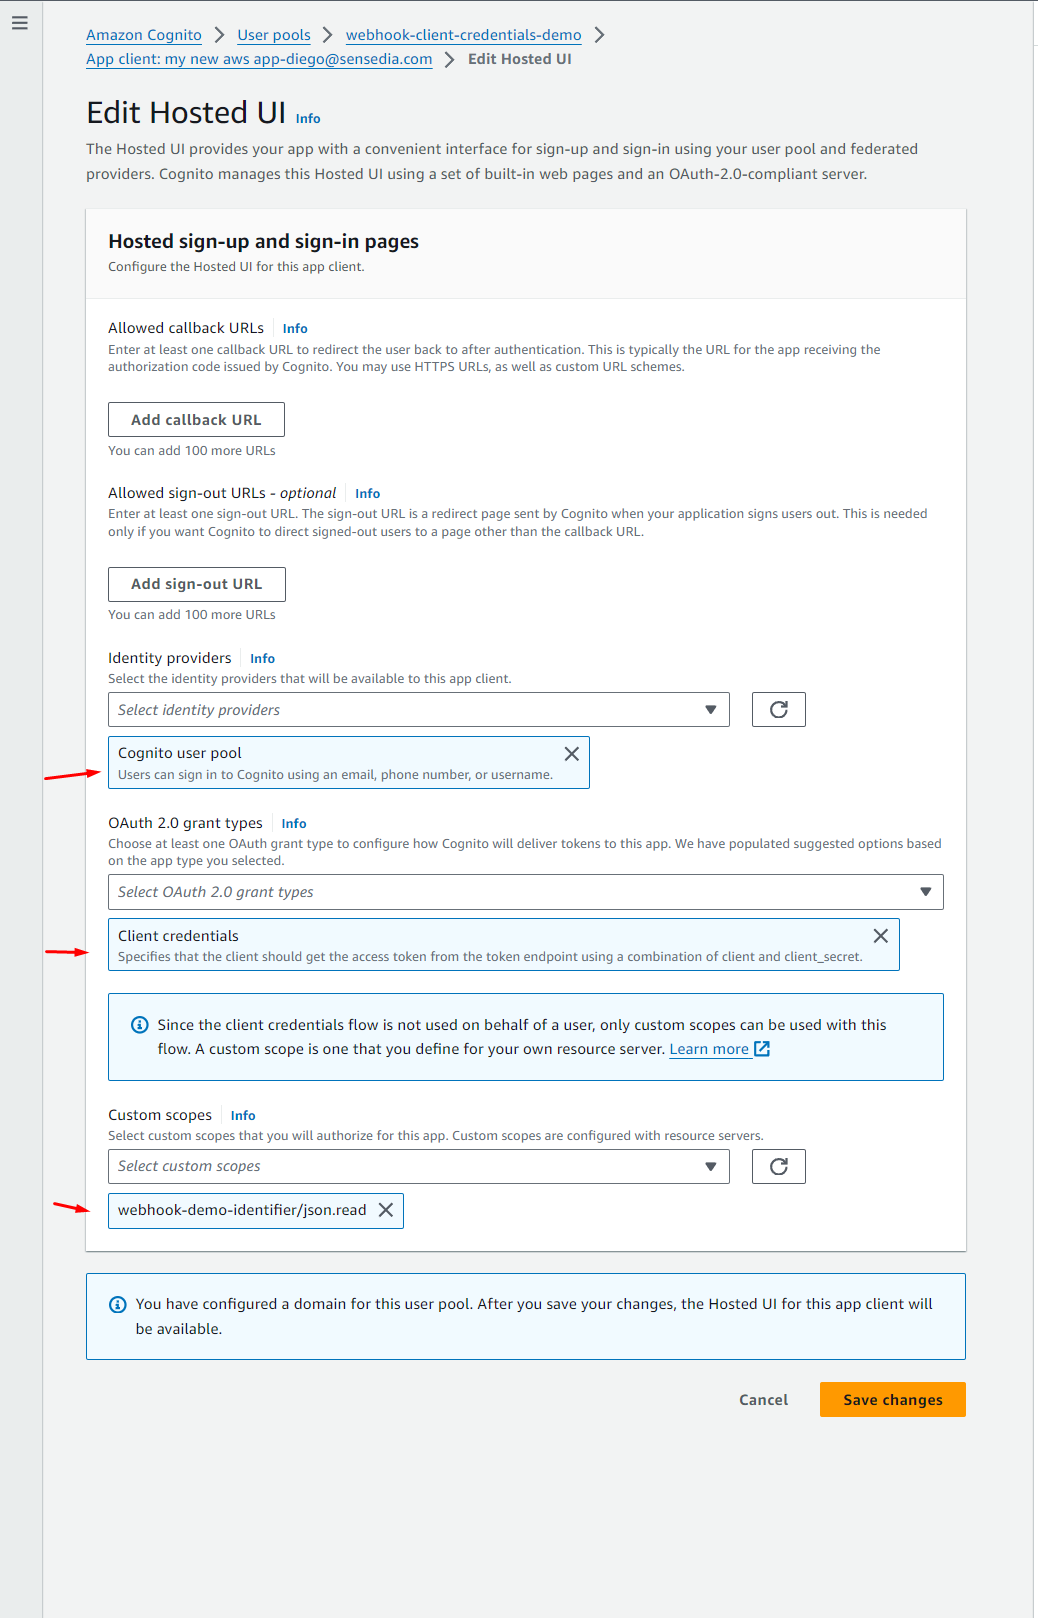
Este app client terá as configurações necessárias para gerar Client Credentials:

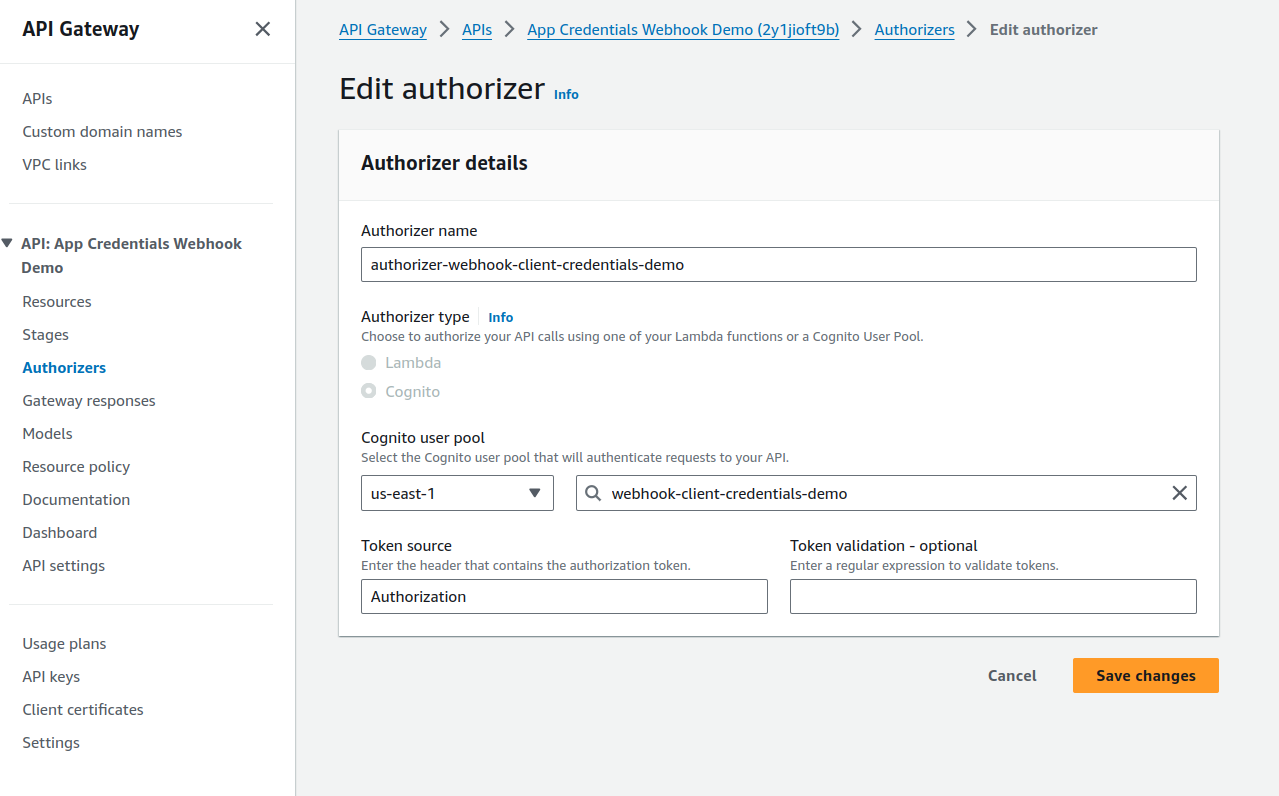
Para autenticar as APIs usando tokens JWT, você deve ter o autorizador configurado no Gateway da AWS e vinculado ao pool de usuários do Cognito.

| Para que os desenvolvedores possam gerar os tokens, você precisará disponibilizar um endpoint fornecendo o client ID e o client secret gerados durante a criação do aplicativo. |
No exemplo abaixo, é utilizado um endpoint do Cognito que gera o token de acordo com o grant-type:
Request
curl --location 'https://<your-cognito-domain>.auth.us-east-1.amazoncognito.com/token' \
--header 'Content-Type: application/x-www-form-urlencoded' \
--header 'Authorization: Basic MmhjZnVuN3Y4amRvYXA4NHNlNjQ0bWZxdm06dXQxcnVrZWs4amU3YXZiNjU4dGZwdTFwY2hrcDFpYzE2azhkbWJzYnJvcGl2amk4cWln' \
--data-urlencode 'grant_type=client_credentials'
Response
{
   "access_token": "eyJraWQiOiJnSlV3UTFOT1ZVbmVHRWJaWGNQK1J2TGdzaGNOOTM1MHZwUVJwbWRnXC9hYz0iLCJhbGciOiJSUzI1NiJ9.eyJzdWIiOiIyaGNmdW43djhqZG9hcDg0c2U2NDRtZnF2bSIsInRva2VuX3VzZSI6ImFjY2VzcyIsInNjb3BlIjoid2ViaG9vay1kZW1vLWlkZW50aWZpZXJcL2pzb24ucmVhZCIsImF1dGhfdGltZSI6MTcwOTMyMDk0NCwiaXNzIjoiaHR0cHM6XC9cL2NvZ25pdG8taWRwLnVzLWVhc3QtMS5hbWF6b25hd3MuY29tXC91cy1lYXN0LTFfZVA2aVZ5UDhaIiwiZXhwIjoxNzA5MzI0NTQ0LCJpYXQiOjE3MDkzMjA5NDQsInZlcnNpb24iOjIsImp0aSI6IjFiZjcyMGQ0LTQ3NjUtNGU1Zi1hNDU1LTg4NDg0YTQ5MzFlNyIsImNsaWVudF9pZCI6IjJoY2Z1bjd2OGpkb2FwODRzZTY0NG1mcXZtIn0.MQlT8YXAkXEmtLiFV_K7pq6aEylwEo1FrAx1At3PeFHkZ82lbuxXcHvVU8CFUfhURAXBqhTRR-KTT1LpBj6i_JUUhr_2obwVgZfKn1n94pfRw0tny8S5g88vuhuqNXn4CypnwrtGzoyYgV9liXykMX-80Y6ILZgtBcaFaBwpEsShv9Q9Q1S-XwQcQSCG0NF4-LF-bFx_KW3ZA3kV5IVVP0XpupYiP7My346kQUqCYboEeaoTDbEz_HqPTI6-r9Wnud7FvrXzl6YT0fhU6SHhx5QeI-zARemrI561Xf5cKkljuYSOWkSBRTADV-pKMj--X6WiBRZmDPN2f-0ziwAQpw",
   "expires_in": 3600,
   "token_type": "Bearer"
}
Revogando credenciais
API Keys
Veja o exemplo abaixo:
 def delete_api_key(request_body):
    """Deletes an API key."""

    client = boto3.client("apigateway")

    try:
        current_credential_type = request_body.get("credentialType")
        validate_credential_type_is_supported(current_credential_type)

        api_key_id = request_body.get("apiKeyId")
        if api_key_id is not None:
            client.delete_api_key(apiKey=api_key_id)
    except client.exceptions.NotFoundException:
        pass
    except Exception as e:
        logger.error("delete_api_key error: %s", str(e))
        return handle_error(str(e))

    return {"statusCode": 204}
Este método irá excluir a API Key do console da AWS.
Client Credentials
Veja o exemplo abaixo:
 def delete_cognito_app_client(request_body):
    """Deletes a Cognito app client."""
    cognito_client = boto3.client("cognito-idp")

    try:
        current_credential_type = request_body.get("credentialType")
        validate_credential_type_is_supported(current_credential_type)

        app_client_id = request_body.get("clientId")
        cognito_client.delete_user_pool_client(
            UserPoolId=USER_POOL_ID, ClientId=app_client_id
        )
    except cognito_client.exceptions.ResourceNotFoundException:
        pass
    except Exception as e:
        logger.error("delete_user_pool_client error: %s", str(e))
        return handle_error(str(e))

    return {"statusCode": 204}
Este método irá excluir o app client da console da AWS.
Share your suggestions with us!
Click here and then [+ Submit idea]