Thanks for your feedback!
EDIT
Workflows is a feature that seeks to give total control over the API lifecycle. Workflows are composed of stages, which mark API development steps, with customizable requirements to define promotion conditions between stages.
Remember the different governance styles, adapted to the needs of each team? Workflows allows you to put that into practice! Each team can have different stages, with specific requirements, representing the different API design demands that operate in their scenario. And, by including the different workflows in the same place, it is easy to see how each team works and how the organisation’s strategy unfolds in the day-to-day lives of APIs.
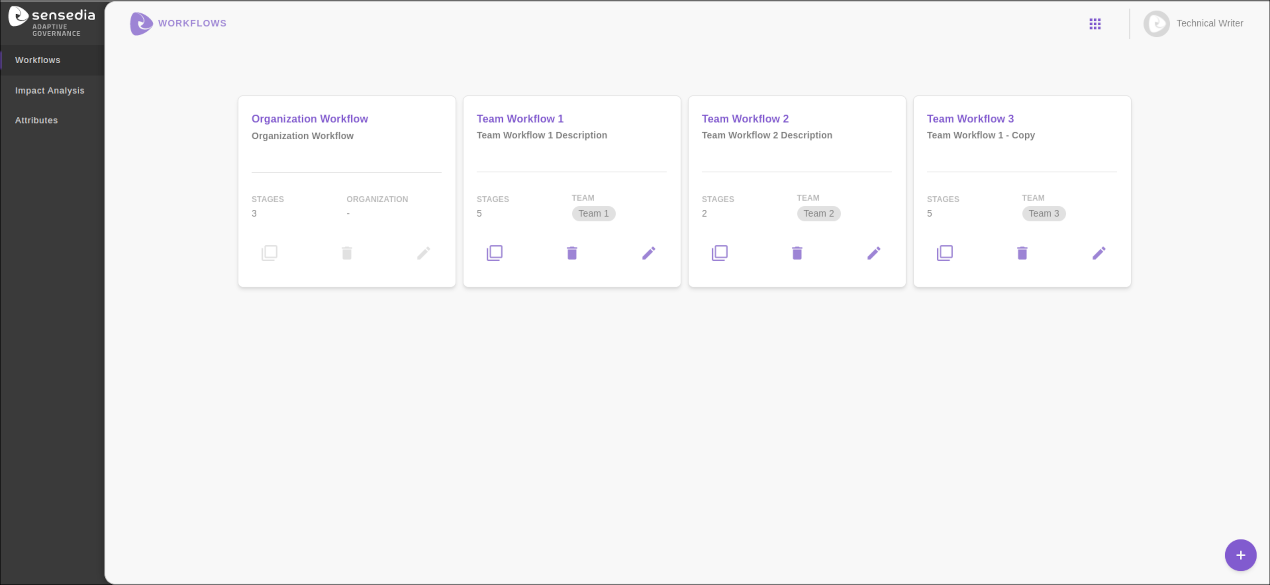
The Workflows screen is accessible from the main menu of Sensedia Adaptive Governance. On this screen, you can view the workflows already created (including the organisation’s workflow), as well as create new workflows by teams.
A workflow organises the API lifecycle. It consists of stages, each defined by a series of requirements. For an API to be promoted to the next stage, it must meet the standards defined for the stage. Everything is fully customizable: the number of stages, their names and requirements. With that, different teams from the same organisation can have workflows adapted to their development reality.
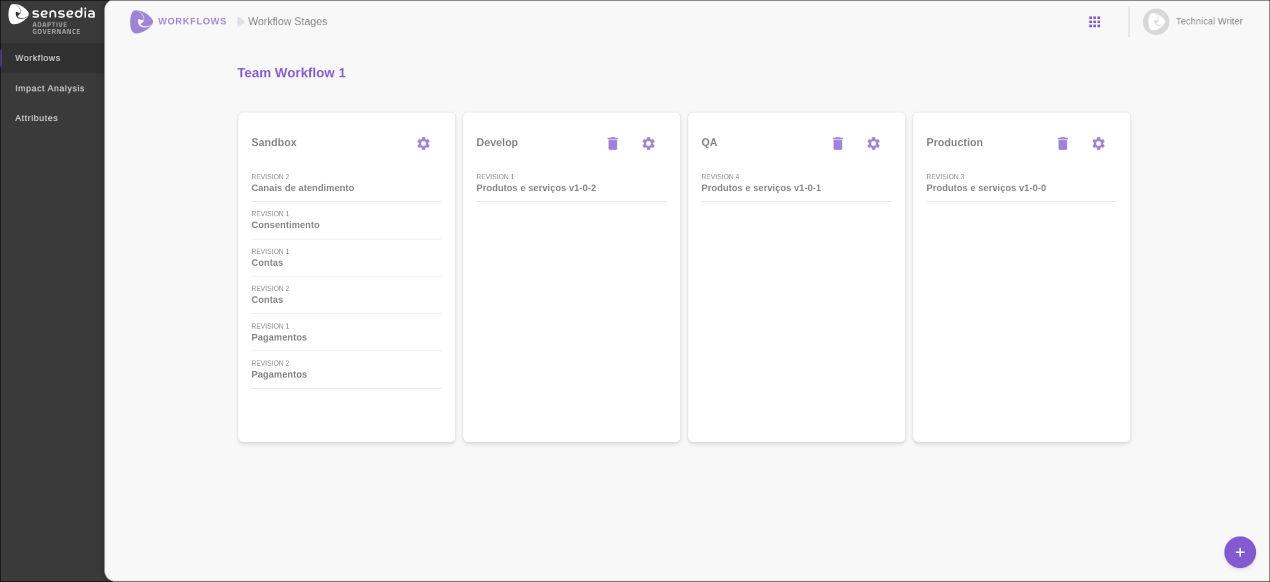
By clicking on the name of a workflow in the list on the Workflows screen, you can view, edit and/or delete the stages that comprise it, as well as add new stages to this workflow. On each stage, you can also view the APIs and API Revisions that are in it:
|
The stage of an API managed on Sensedia API Platform is defined in the editing or creating screens of the API, in the field Workflow Stage. A stage can only be selected if the API meets the requirements set for it. 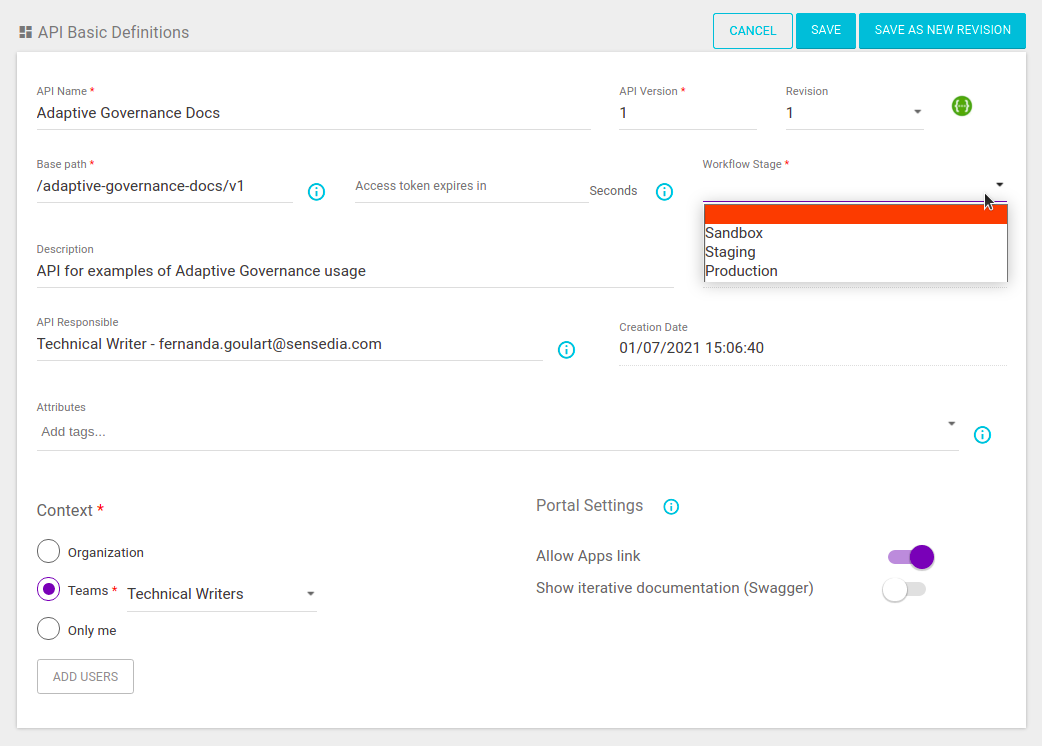
|
There are two types of workflows: Organization Workflow and Team Workflow. To increase control at the company level, there can only be a single Organization Workflow. You can create multiple Team Workflows, but only one per team.
|
Although it is only possible to create one workflow per team, it may happen that the same team executes different processes, due to the type of API or the type of demand (for example: legal demand, innovation demand, standard demand, among others, and/or corporate APIs, legacy APIs, internal APIs, among others). In these cases, for each process executed, the same team can be registered several times — with different and representative names — to be associated with their respective workflows. Example: Team A - Legal -> Workflow Team A - Legal Team A - Innovation -> Workflow Team A - Innovation Team A - Corporate -> Workflow Team A - Corporate Team A - Legacy -> Workflow Team A - Legacy |
The workflows you create relate to the API context, which establishes the visibility rules for each API: The Organization Workflow will be applied to all APIs set to organization, teams or only me contexts that do not have their own workflow. If the context of an API is set to teams and the team has a registered workflow, the stages available for selection in the Workflow Stage field of the API edition or creation screens will be the stages created within the team’s workflow.
|
There can only be one Organization Workflow, which comes by default. Thus, the workflow creation process only applies to Team Workflows. |
To create a new Team Workflow, click the + button, located in the lower right corner of the Workflows screen. A modal window will open for you to enter the data.
The following fields must be completed:
Name: Enter the workflow name.
Description: Provide a description for it.
Team: Select a team.
Once the fields have been filled in, click on the CREATE WORKFLOW button to save the workflow.
The card of your new workflow will appear on the Workflows screen. On it, it is possible to see the name of the workflow, its description, the number of existing stages and the team.
It is possible to clone an existing Team Workflow by clicking on the icon ![]() in the lower left corner of the card of the workflow to be cloned.
in the lower left corner of the card of the workflow to be cloned.
This will create a new Team Workflow with the stages already configured according to the cloned workflow.
By clicking on the icon ![]() , a modal window will open so that you can enter the name, description and the team to which the new workflow will be associated.
Once you have finished editing the information, click on CLONE WORKFLOW to create the new workflow.
, a modal window will open so that you can enter the name, description and the team to which the new workflow will be associated.
Once you have finished editing the information, click on CLONE WORKFLOW to create the new workflow.
|
It is possible to change the basic information of a Team Workflow, i.e. name, team and workflow description. It is not possible to edit an Organization Workflow, only to configure its stages. See how to do it below.
To edit a Team Workflow, click the ![]() icon located in the lower right corner of the corresponding card.
A modal window containing a form with the workflow information will open.
icon located in the lower right corner of the corresponding card.
A modal window containing a form with the workflow information will open.
Once all the desired changes have been made, click on SAVE WORKFLOW to save them (or on CANCEL to discard them).
By clicking on the name of a workflow on a card, you will be directed to the visualisation screen of the stages of this workflow, where you can add or delete stages and change the information and requirements of each stage.
Every new workflow already has an initial stage, called "Stage One" by default. It is not possible to delete this stage, only to edit it (see below how to do it).
To add a new stage to the workflow, click on the + button, located in the lower right corner of the screen. A modal window will open for you to enter the name (in the field Name) and the requirements of the stage (in the fields of the REQUISITES section), which refer to the minimum conditions for an API to be included in this stage.
The fields of the REQUISITES section are:
Environments: select the environments to which the API must have been deployed in order to be on the stage.
Deployable Environments: select the environments that must be linked to the APIs of this stage (and to which these APIs can be deployed).
Attributes (must have): select the attributes that the APIs must have in order to be on the stage.
Attributes (must not have): select the attributes that the APIs must not have in order to be on the stage.
Interceptors (must have): specify the interceptors that must be in the flow of the APIs of the stage.
To add the interceptors, click the ![]() icon of this field.
In the window that opens, first select the interceptor type and then the interceptor and its required settings.
Click ADD INTERCEPTOR.
It is possible to edit the settings of an interceptor that has already been added.
To do this, click on the label of the interceptor to be edited.
icon of this field.
In the window that opens, first select the interceptor type and then the interceptor and its required settings.
Click ADD INTERCEPTOR.
It is possible to edit the settings of an interceptor that has already been added.
To do this, click on the label of the interceptor to be edited.
Interceptors (must not have): specify the interceptors that must not be in the flow of the APIs of the stage. To add the interceptors to this field, follow the same steps described for the Interceptors (must have) field or disable the Must Have button of an already added interceptor.
API Maturity: set the minimum percentage of Interface Completeness (Swagger maturity level) for the APIs on the stage.
Once you have finished the configuration, click on CREATE STAGE to save the stage.
To edit the settings of an existing stage, click the ![]() icon located in the top right corner of the card corresponding to the stage to be edited.
icon located in the top right corner of the card corresponding to the stage to be edited.
A window containing a form with the stage information will open. Here you can change the stage name and its requirements, according to the fields described above. Click the SAVE STAGE button to save the changes or CANCEL to discard them.
|
Whenever a change is made to the rules of a workflow stage, the API teams should be notified to adjust the APIs to the new rules. Some tips on how to do this:
|
To delete a stage, click the ![]() icon located in the top right corner of the card corresponding to the stage to be deleted.
In the window that opens, click DELETE to confirm the permanent deletion of the stage or CANCEL to cancel the operation.
icon located in the top right corner of the card corresponding to the stage to be deleted.
In the window that opens, click DELETE to confirm the permanent deletion of the stage or CANCEL to cancel the operation.
|
The Organization Workflow cannot be deleted.
To delete a Team Workflow, click the ![]() icon of the card corresponding to the workflow to be deleted, on the Workflows screen.
This will open a window for you to confirm the action by clicking the DELETE button.
icon of the card corresponding to the workflow to be deleted, on the Workflows screen.
This will open a window for you to confirm the action by clicking the DELETE button.
| It is not possible to delete a workflow if it contains an API in any of its stages. |
The following are not fundamental rules, but suggestions on how to use the feature:
It’s good practice to leave the entry stage of a workflow (i.e., the first stage) without requirements. This way, everyone will be able to create APIs with no initial restrictions. From there, the following stages should have progressively restrictive requirements, following your API strategy and the team’s development process.
A helpful rule of thumb to keep the "development → staging → production" flow easier to maintain is using deployment environments as a premise to create workflow stages.
If you make any changes to the requirements of a stage that contains APIs, remember to save those APIs again (even if you don’t modify them). Only then will the new rule apply to the APIs that were already at that stage.
Share your suggestions with us!
Click here and then [+ Submit idea]