Thanks for your feedback!
EDIT
Attributes is a feature for classifying APIs through customisable tags, which makes it easier to find APIs in the portfolio and to understand the business context around the APIs. Furthermore, since you can create attributes following business rules, the feature gives more visibility to the company’s API strategy.
Attributes are composed of a name and one or more values (the tags). After you enter the attributes that fit your governance needs, you can associate these attributes and their corresponding tags with your APIs, classifying the latter. And you can also use the attributes as requirements for workflows.
This means that, when you create attributes that fit your company’s business models, you are able to classify your APIs by associating them with a given business model and, with the workflows, ensure that the APIs use the adequate attributes.
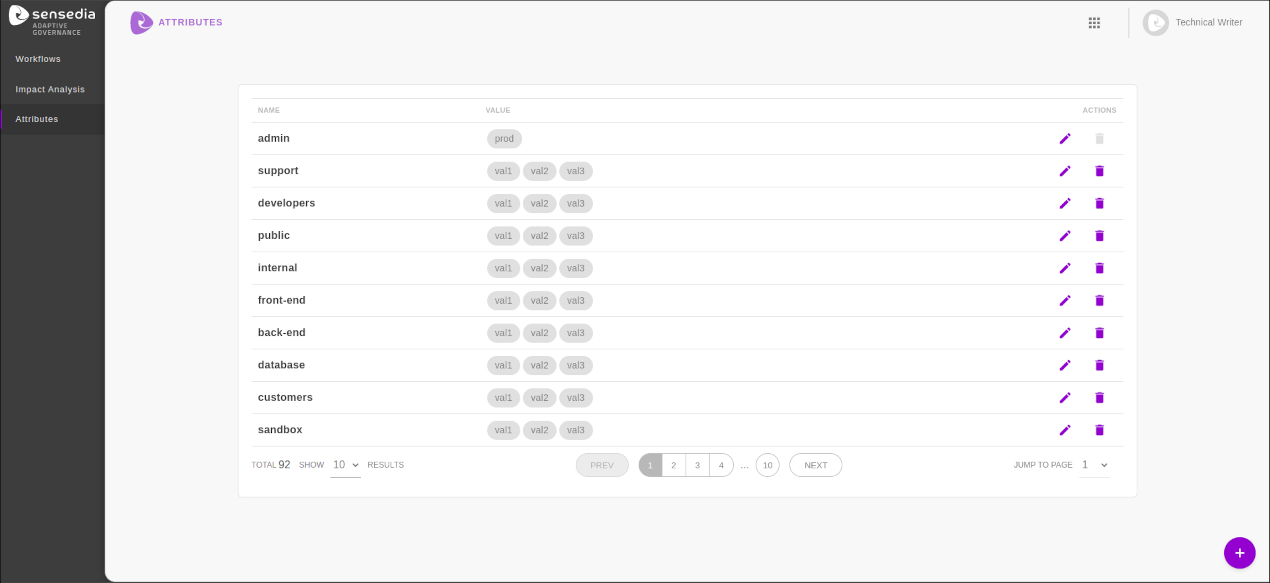
The Attributes screen is accessible from the Sensedia Adaptive Governance main menu. There you can register new attributes, as well as edit or delete those already registered.
| The linking of attributes to APIs managed on Sensedia API Platform is done at the stage of creating or editing an API on the Platform itself. |
To add a new attribute, click the + button, located in the bottom right corner of the Attributes screen.
A modal window containing a form for creating the attribute will open. The form contains the following fields:
Name: Provide a name for the attribute.
Values: Insert the tags for the attribute. To assign a new value, type the desired text and then press the ENTER key.
Once the fields have been filled, click on the CREATE ATTRIBUTE button to save the attribute.
|
The following rules apply to the creation of attributes:
|
The Attributes screen displays a table listing the attributes that have already been registered.
For each attribute (row), the following information is displayed (columns):
NAME: Name of the attribute.
VALUE: Values (tags) assigned to the attribute.
ACTIONS: Contains the following buttons:
![]() : Allows you to edit the attribute.
: Allows you to edit the attribute.
![]() : Allows you to delete the attribute.
: Allows you to delete the attribute.
To edit an attribute (i.e. insert or remove values), click on the ![]() button of the row corresponding to the attribute you want to edit, in the list of registered attributes.
button of the row corresponding to the attribute you want to edit, in the list of registered attributes.
A modal window containing a form with the attribute information will open. In the Values field of this form you can:
add new values to the attribute;
remove a specific value.
If the tag is not linked to an API, the X icon will be available next to its name.
Click this icon to delete the tag;
remove all values registered for the attribute that are not linked to an API.
To do so, click the X icon located in the upper right corner of the Values field.
Once you have made all the desired changes, click on the EDIT ATTRIBUTE button to save them (or on CANCEL to discard them).
|
It is possible to completely delete an attribute (deleting the name and all values).
To do this, click the ![]() button on the row of the desired attribute, within the list of existing attributes.
In the window that opens, click DELETE to confirm the deletion of the attribute or CANCEL to cancel the operation.
button on the row of the desired attribute, within the list of existing attributes.
In the window that opens, click DELETE to confirm the deletion of the attribute or CANCEL to cancel the operation.
|
It is not possible to delete an attribute that is being used in a workflow stage. |
Share your suggestions with us!
Click here and then [+ Submit idea]