Creating an Azure Connection

See on this page how to:

Access Credentials

To access Azure APIs using SDKs, you need these credentials:

  • Client ID

  • Tenant ID

  • Client Secret

  • Subscription ID

Check out the Azure documentation for more details.

Client ID, Tenant ID, and Client Secret

To get the Client ID and Tenant ID, you need to create an App Registration (Service Principal) in Azure. After creating the application, add a secret (Client Secret) and the required permissions.

How to create an App Registration (Service Principal) in Azure and get the Client ID and Tenant ID:

  1. Log in to the Microsoft Azure portal.

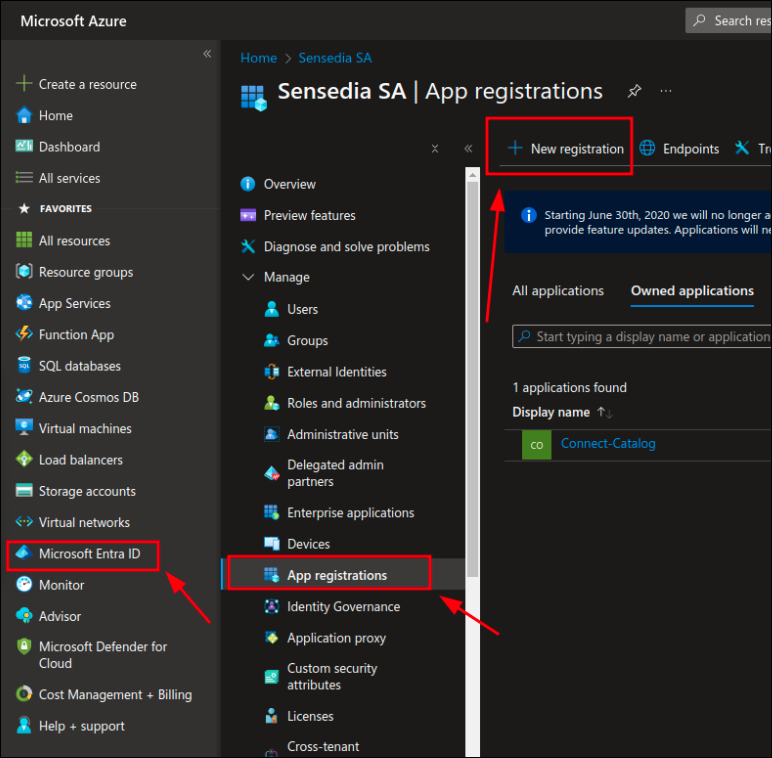
  2. Go to Microsoft Entra ID.

  3. Click on App Registrations and then on + New registration.

    Azure screen for app registration

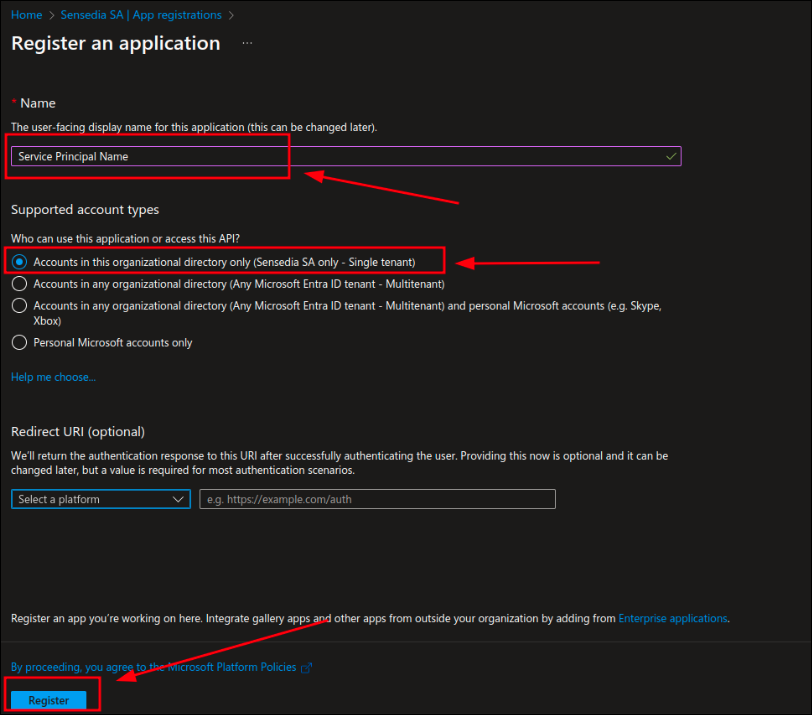
  4. On the Register an application screen:

    • Enter a name for the application.

    • In Who can use this application or access this API, select Accounts in this organizational directory only.

    • Click the Register button.
      Azure screen for app registration creation

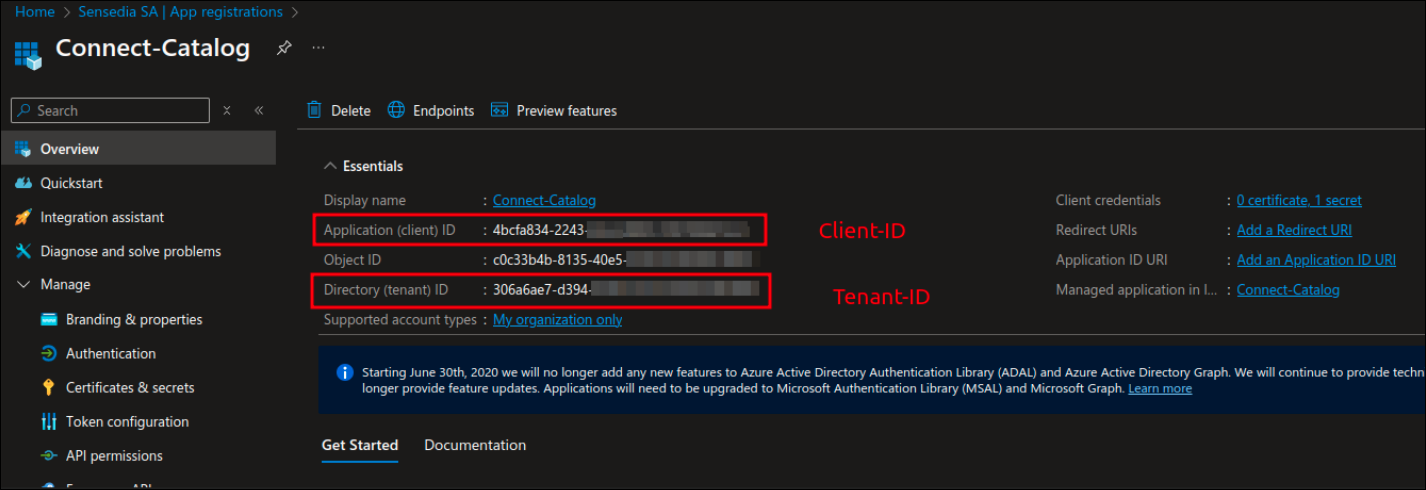
  5. Note down the following IDs:

    • Application (client) ID.

    • Directory (tenant) ID.

      Azure screen for app registration


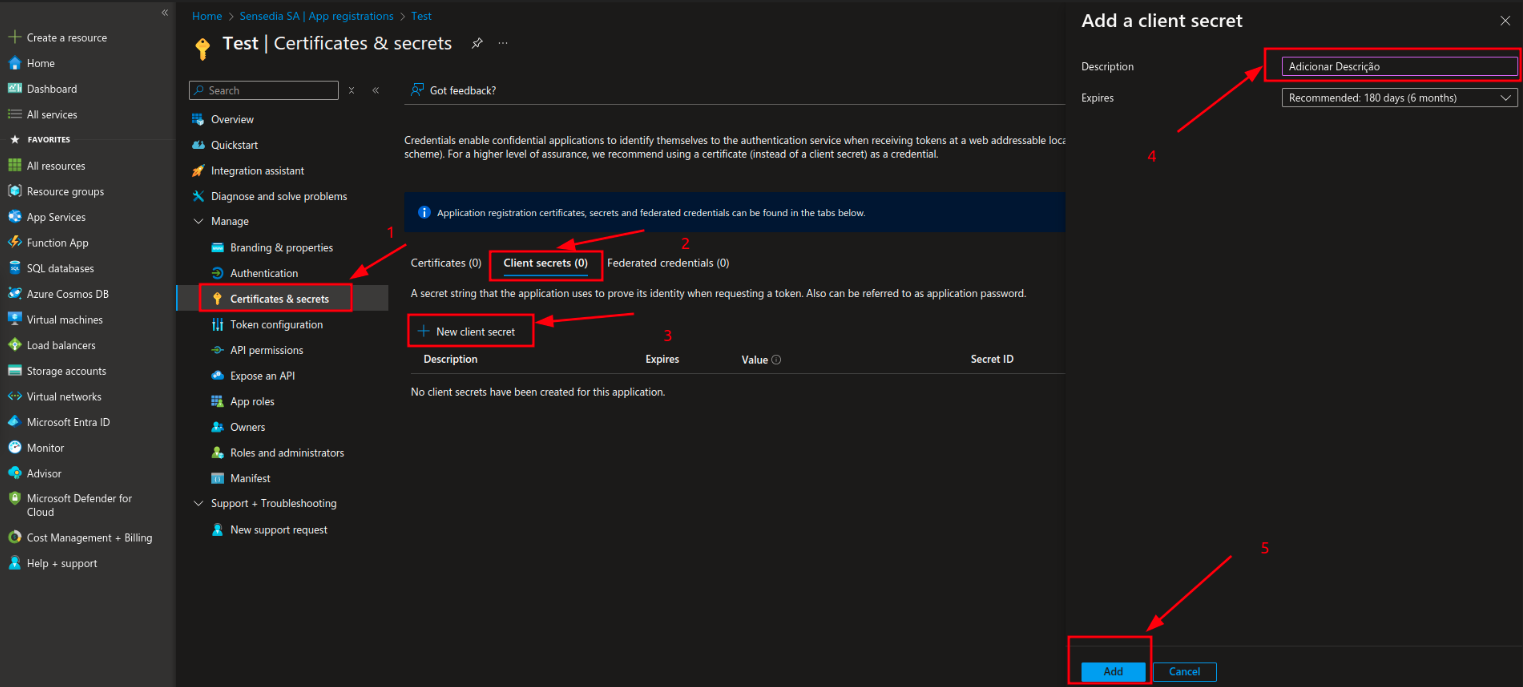
Here’s how to add a secret to the App Registration:

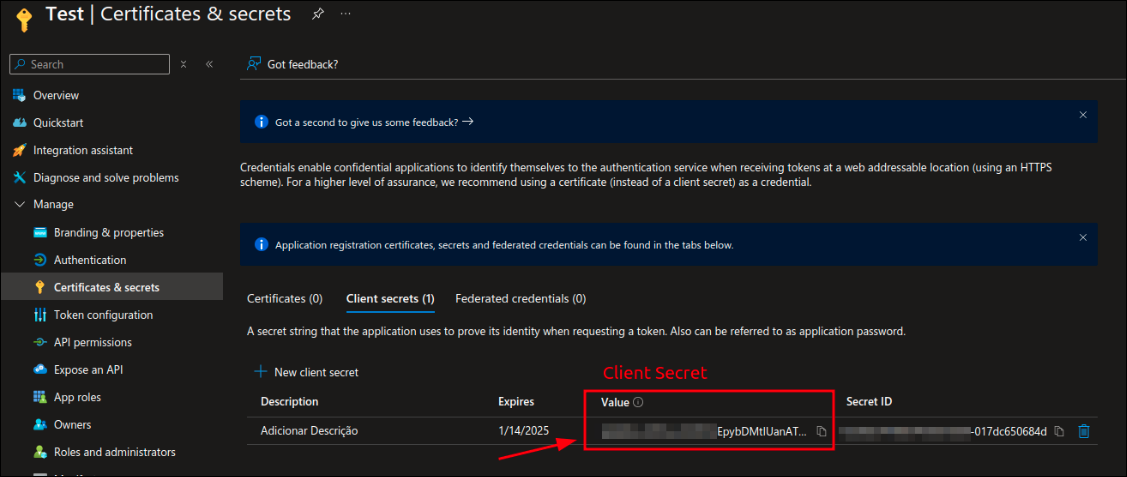
  1. Go to Certifications & secrets.

  2. Select the Client secrets tab.

  3. Click on New client secret.

  4. Provide a description and set an expiration date.

  5. Click Add.

    Azure screen

  6. Take note of the Client Secret.
    It is displayed in the Value field.

    Azure screen

    The Client Secret is only displayed during creation.


Subscription ID

Steps to obtain the Subscription ID:

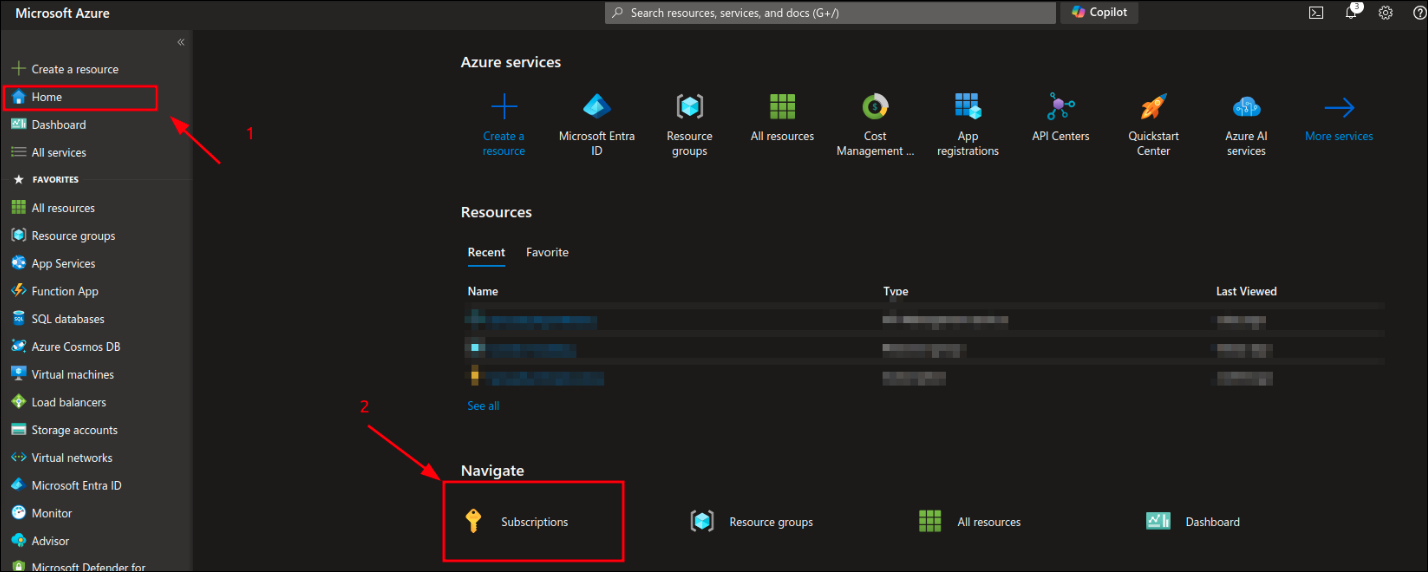
  1. Select Home.

  2. In Navigate, click Subscriptions.
    Azure screen for subscription ID creation

  3. Note down the Subscription ID.
    Azure screen for subscription ID creation


Adding Permissions to the Service Principal

To read information from Azure API Management, you need to assign the API Management Service Reader role to the Service Principal.

Refer to the Azure documentation for more details.

Steps to assign a role:

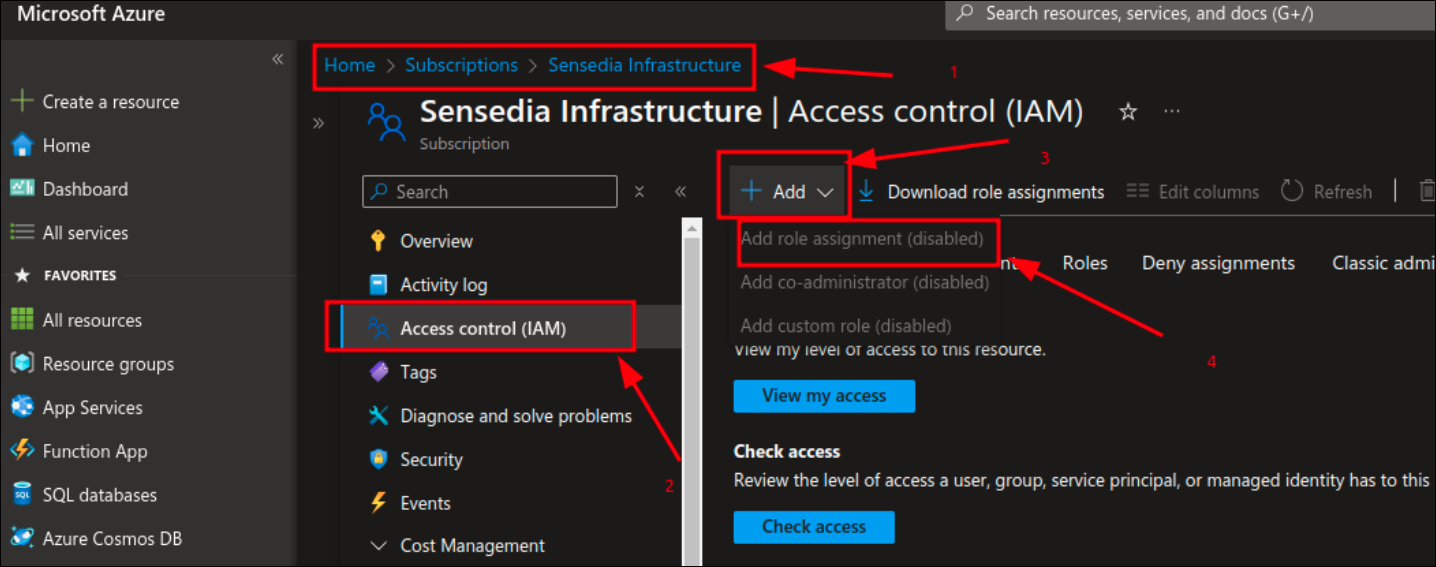
  1. Click Home.
    In Navigate, click Subscriptions.

  2. Select Access Control (IAM).

  3. Click + Add, then Add role assignment.

    Azure screen

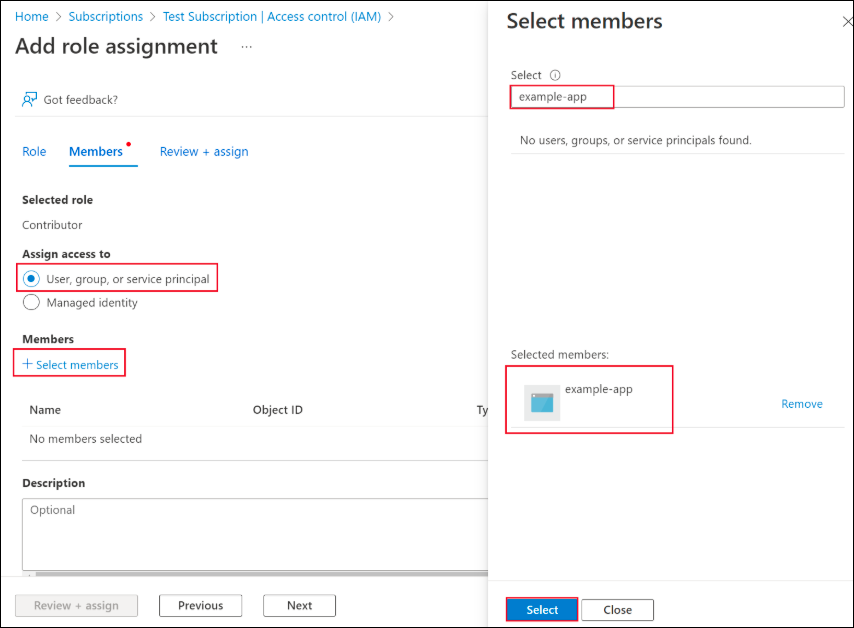
  4. In the Members tab, under Assign access to, select User, group, or service principal.

  5. Click on + Select members and search for your App name.
    Select the App and click on Select.
    Azure screen

  6. Click on Review + assign.

Creating a new connection

  1. Go to the Connections screen by clicking the left side menu or the card on the home screen.

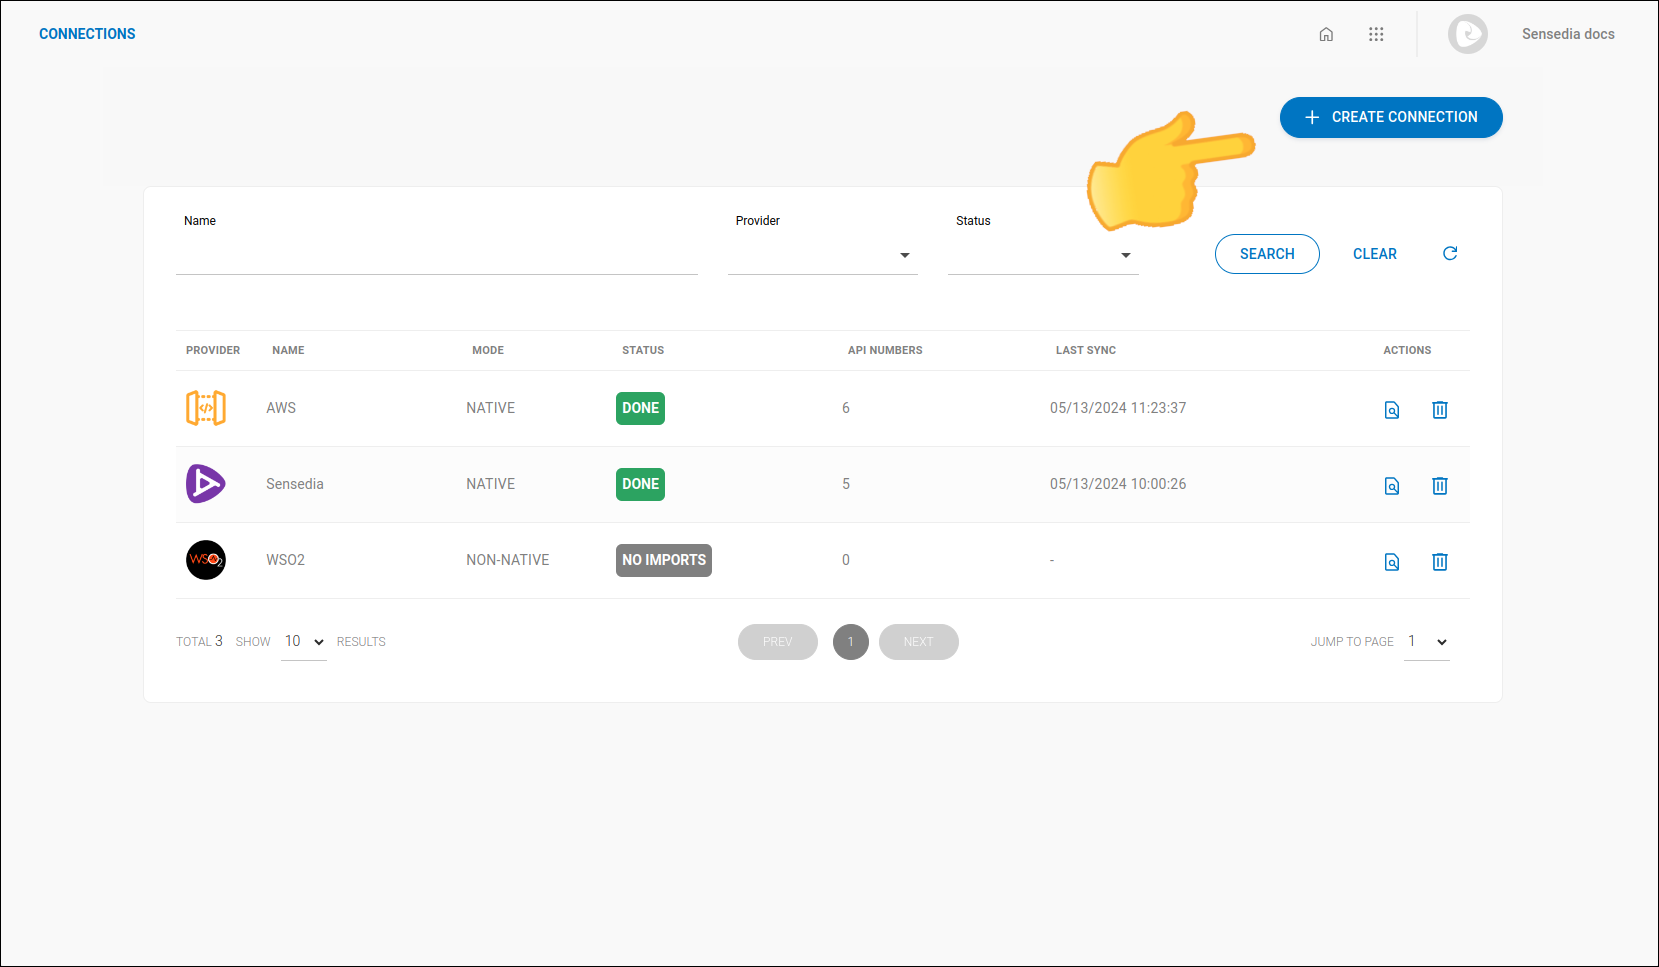
  2. Click the + CREATE CONNECTION button, located in the top right of the screen.
    screenshot of the connections screen with the create connection button highlighted

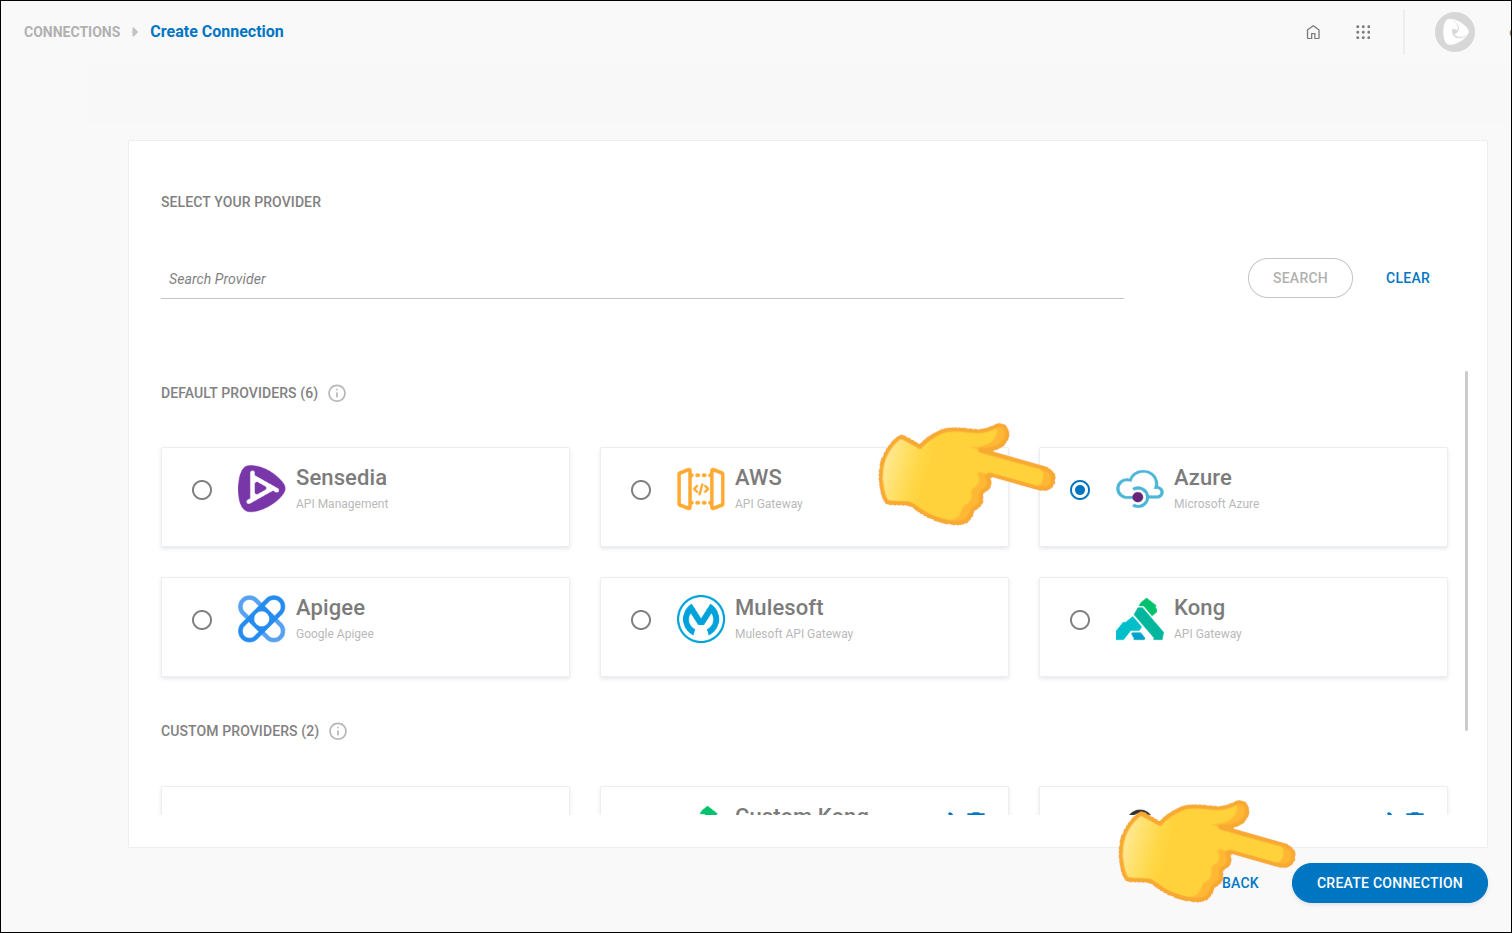
  3. In step 1 - PROVIDER, type or select the connection provider.
    detail of the connection creation screen with step 1

  4. Click NEXT.

  5. In step 2 - CONNECTION, provide the following information:

    • Connection mode: Select the connection mode: whether it is native (data updated directly with the provider) or not (manual upload).

      Synchronization in native connections depends on credentials being registered with the provider.
    • Connection name: Define a name for the connection.

  6. In the last step, review the information. If correct, click SAVE.

Importing APIs

To import APIs, follow the steps below:

  1. Go to the Connections screen by clicking the left side menu or the card on the home screen.

  2. Find the connection you want to edit and click the icon view 2 icon.
    If needed, use the search bar to locate the desired connection.

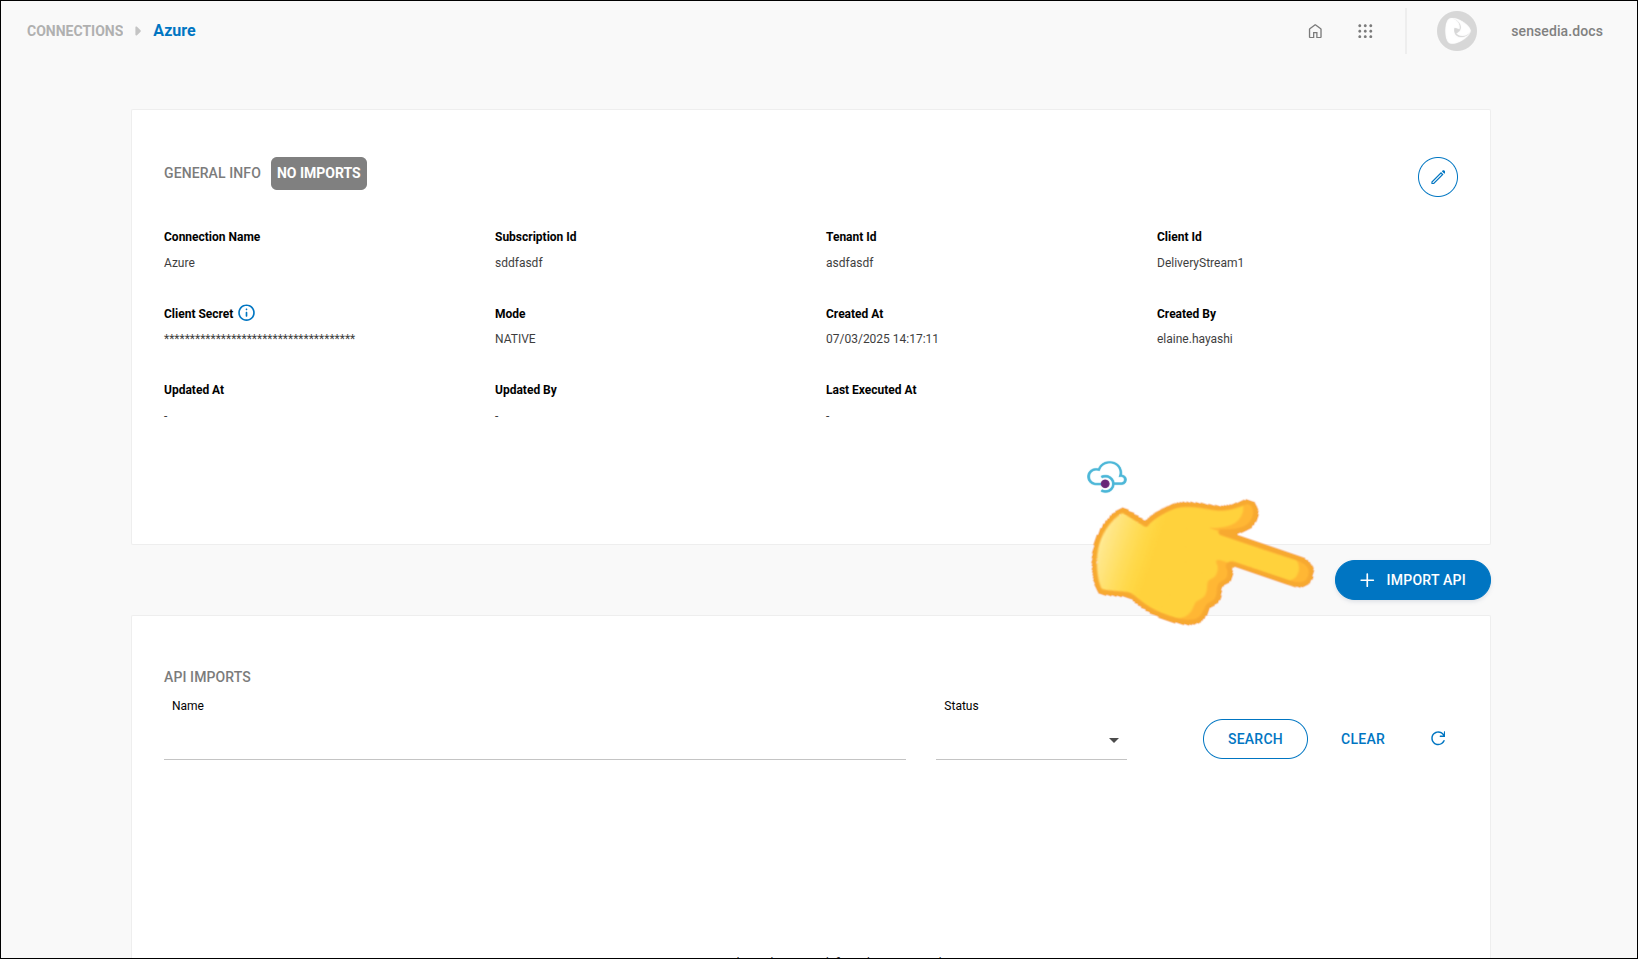
  3. On the API Imports screen, click the + IMPORT API button, located just below General Info and above API Imports.
    screenshot of the API import screen

  4. Select the APIs you want to import and click SAVE.

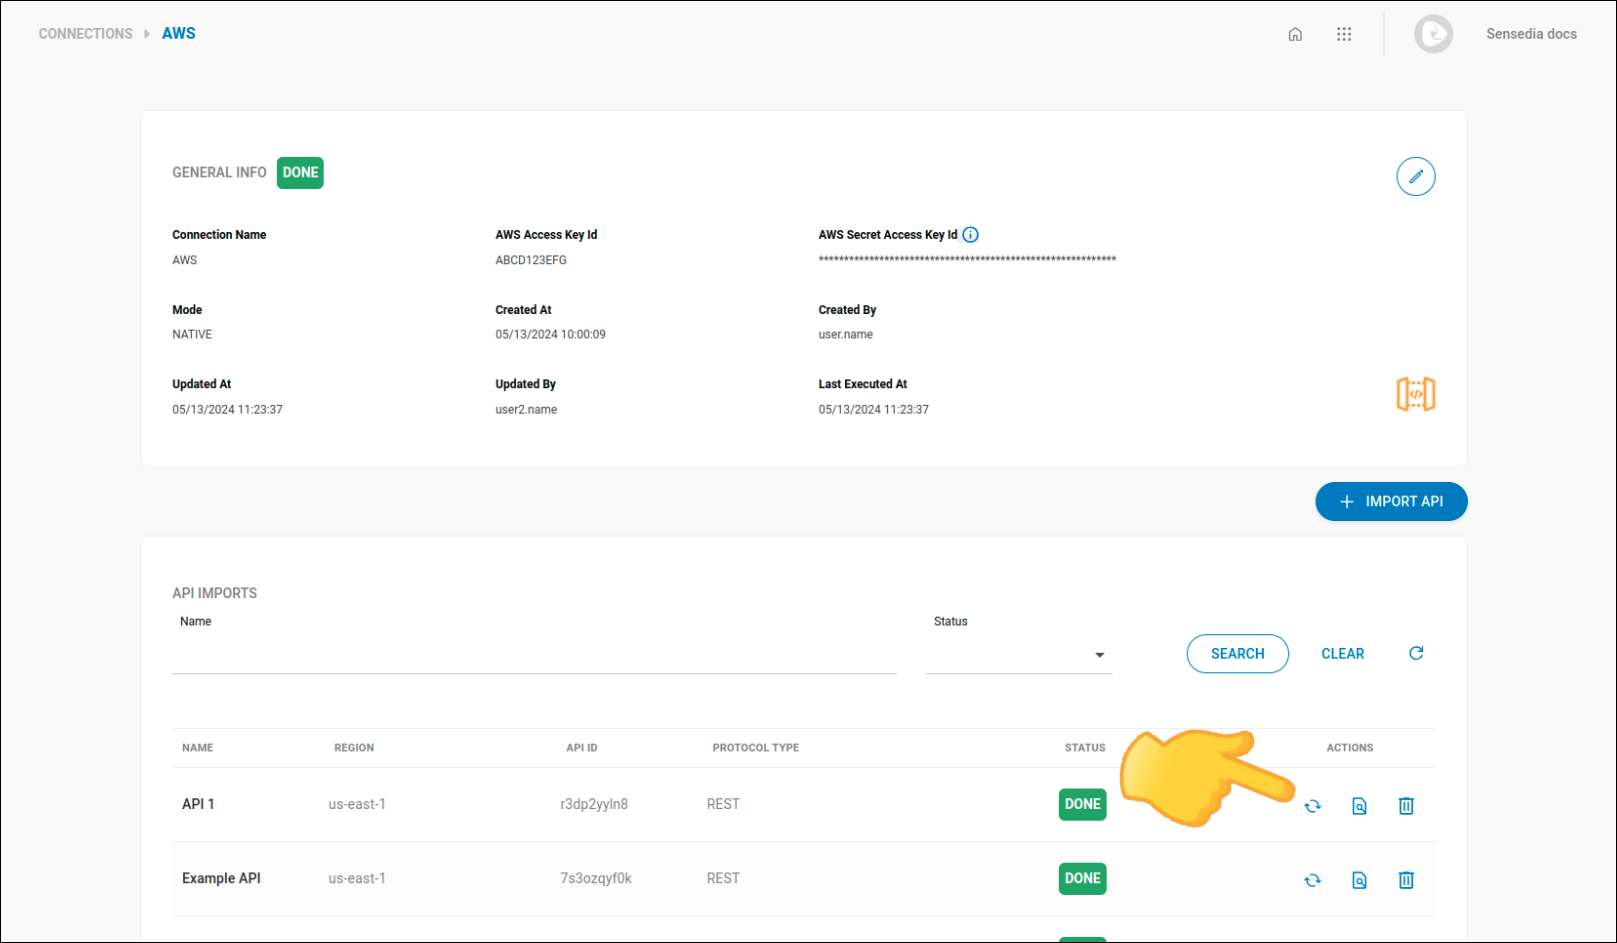
Whenever an API is updated, click refresh icon.
detail with the refresh imported APIs button

Thanks for your feedback!
EDIT

Share your suggestions with us!
Click here and then [+ Submit idea]