Thanks for your feedback!
EDIT
The Authorizations screen allows you to configure endpoints to validate the client ID and/or access tokens of event publishers, allowing them to send requests to Events Hub.
To define authorized requests, you can add security interceptors such as OAuth Validation, JWT Validation, Client ID Validation and Access Token Validation to the policies applied to handlers. When at least one of these interceptors is used, Events Hub will send requests to the authorization URLs configured on this screen to validate the publishers and accept their requests.
|
The use of security interceptors is optional. However, if you add policies to your handler, you need to configure the Authorization URL linked to the interceptor. Except for "IP Filtering Validation," all others depend on this configuration to work. If you are using the Sensedia API Platform for this, here’s how to obtain the authorization URL. |
| Sensedia API Management v5 clients: To obtain the authorization URL, you must import the Events Hub authorization API. |
The configuration of authorization URLs is done by contexts, which are one of the markers of the event publication URL, formed by: base URL + context + handler + topic.
This context-based configuration makes it easier to send events from different scenarios to the same topic, such as events from production and test environments.
|
See more about how contexts work.
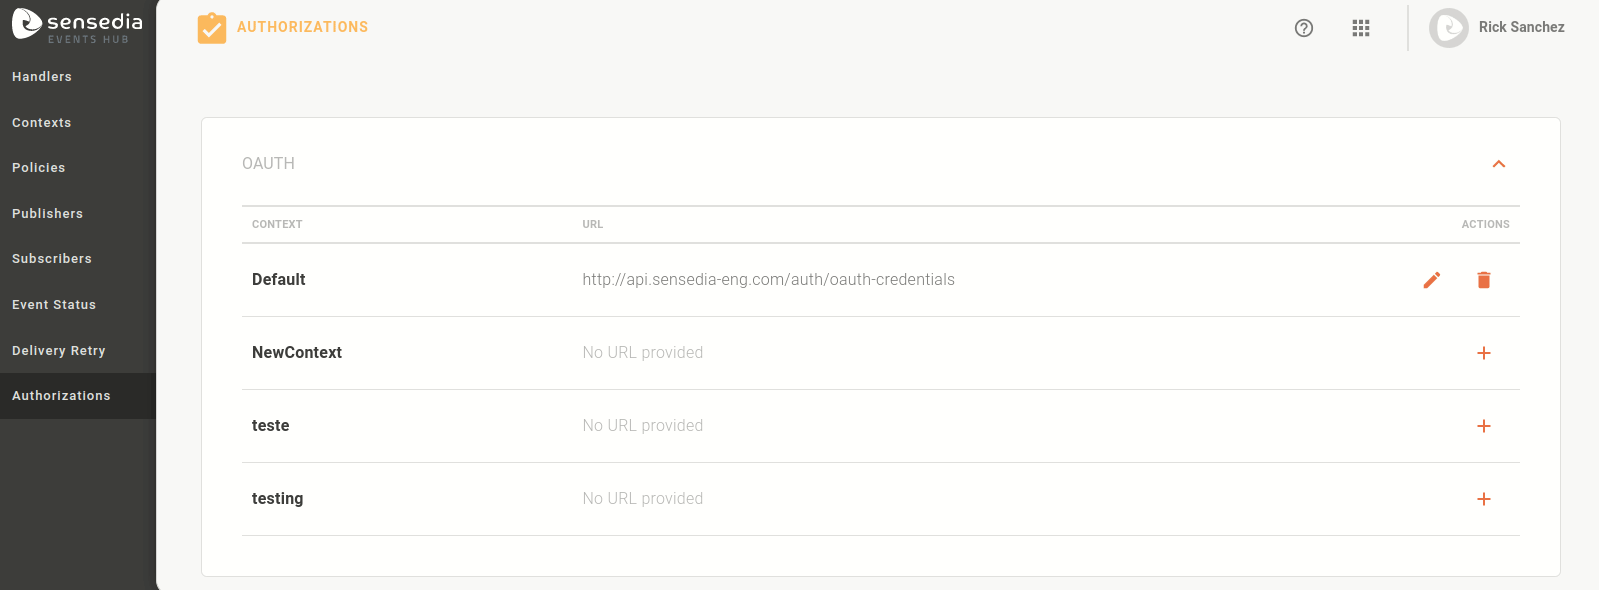
The Authorizations screen has two sections: OAUTH and JWT. Both show all the contexts registered on Events Hub, indicating the authorization URL that is defined for each one.
If no authorization endpoint is registered for the context, there will be the icon ![]() in the ACTIONS column to add a URL.
in the ACTIONS column to add a URL.
If a URL is already registered, the icon ![]() allows you to edit it and the icon
allows you to edit it and the icon ![]() allows you to delete it.
allows you to delete it.
|
To use the Sensedia API Platform as the policy validation server, you need to do some configurations:
Access and search for API Events Hub Authorization;
In the API Events Hub Authorization, go to the Environments section.
Choose the environment you want to configure, click on the ![]() , and copy the URL.
You will need to complement it with interceptor information, so paste it into a file;
, and copy the URL.
You will need to complement it with interceptor information, so paste it into a file;
Go to the Resources and Operations section and copy the POST path of the interceptor type you will use;
Paste the interceptor’s path at the end of the environment URL. This will be your authorization URL;
With the full URL copied, access and find the context that will be validated by this authorization;
Click on the icon ![]() , paste the authorization URL and save.
, paste the authorization URL and save.
| If you are registering a test context for authorization, in the Environments section, copy the link of your test environment. |
The Resources and Operations section is divided between OAuth and JWT. When copying the path of your URL, be aware that:
The authorization URL must be generated respecting the policies added to the context;
If you added OAuth Validation interceptors, copy the OAuth path.
If you added JWT Validation interceptors, copy the JWT path.
Share your suggestions with us!
Click here and then [+ Submit idea]