Contexts

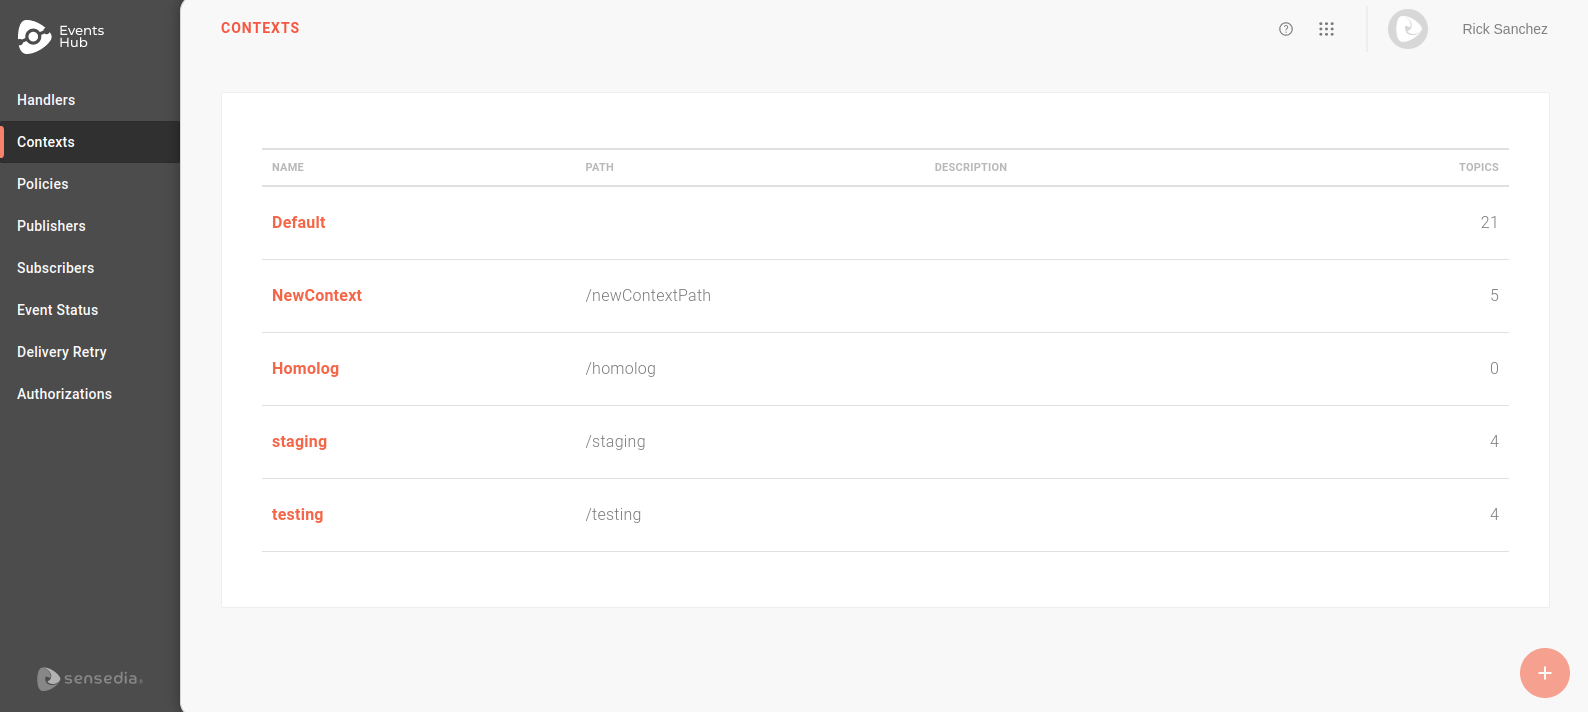
The Contexts screen lists all contexts configured on your Events Hub:

contexts

Briefly, a context is a logical division that serves as a placeholder for the event publication URL. However, that are specificities in how they work that should be taken into account. The section about their operation below explains in detail the role of contexts in the publication and distribution of events. In the rest of this page, you can read about how to create and edit contexts.

How contexts work

To understand the role of contexts, let’s see how Events Hub coordinates event publication and subscription.

Event publishers send requests to Events Hub, which then distributes them to all registered subscribers. To make sure that the correct event distribution path is followed (that is, to guarantee that each publisher’s event is forwarded to all due subscribers and only to them), Events Hub has topics. Each topic can have numerous subscribers. When a publisher submits an event to a given topic, Events Hub distributes the event to all subscribers linked to the topic.

The publication channel is the URL used by publishers to send requests to Events Hub. This URL consists of a series of placeholders: Base URL + context + handler + topic.

The base URL is defined by Events Hub, which concatenates the address of each client’s interface + event-receiver + a hash. Context, handler and topic are created by the user. The topic, as we have already discussed, defines the subscription. It is through it that Events Hub organizes who should receive each event. Handlers are topic aggregators, working as a logical grouping layer and helping to create and maintain topics. Security policies and automatic delivery retries are applied at the handler level, so all topics of a handler share the same policy.

Finally, contexts add another placeholder to the URL. For a topic to be made available to a publisher, it must be enabled in at least one context. How does this modify publication URLs?

Example 1

Imagine a topic called "latency" grouped in a handler called "Alerts" (path: /alerts). When you create the topic, suppose you enable it in two contexts: "Dev" (/dev) and "Testing" (/testing):

  • in the "Dev" context, the publication URL will be: <base-url>/dev/alerts/latency;

  • in the "Testing" context, the publication URL will be: <base-url>/testing/alerts/latency.

In addition to creating another logical separator that helps to categorize the publishing channels, contexts help because they make it possible to use the same topic in different scenarios without having to duplicate the topic to control the access of publishers and subscribers. In addition to this, the user defines publisher authorization endpoints at the context level, which allows the same topic to have more than one authorization server. See the example below to understand this better.

Example 2

Imagine that the topic "latency" described in example 1 is being used in the default context, already exposed to partner publishers and subscribers. You want to send some test events for that topic, and so you create a publisher for your development team.

But you have two initial problems:

  1. you do not want partner subscribers already linked to the topic to receive your test events;

  2. you want the publisher of your development team to use an authorization mock instead of the endpoint used by the default context.

In this case, enabling different contexts solves both problems. Publishers and subscribers who are already feeding and consuming the topic remain associated to the default context. You can now use the "Testing" context for the test events you want to send.

To do this, you need to enable this context for the topic "latency". In addition, you must also enable the topic for your development team’s publisher: link the topic "latency" to the publisher in the TOPICS step when creating/editing the publisher and enable "Testing" as the publishing context. The same process must be done with the subscribers who are to receive the test events: when creating/editing them, subscribe them to the topic "latency" in and enable "Testing" as a subscription context.

Now, when the publisher sends events to the topic "latency" in the context "Testing" (using the publication URL formed by: <base-url>/testing/alerts/latency), only the subscribers associated with the topic and with the context “Testing" enabled will receive the event.

To solve the authorization problem, just go to the Authorizations screen and insert the authorization endpoint that should be used to validate publishers when submitting requests to the "Testing" context. If you configure an authorization mock for "Testing", publishers who send events to it will be validated by the mock, while the default context will use the endpoint defined for it.

It’s important to keep in mind that contexts are logical divisions that aim to facilitate the creation and maintenance of topics, enabling their reuse in different scenarios. Contexts are not physically separate environments.

This means that if you use the "Default" context for productive events and the "Testing" context for test events, you can control publishers, subscribers and authorization endpoints for each context, but all events received and distributed on Events Hub will share the same infrastructure.

Tests that burden the infrastructure, even if done in the "Testing" context, may affect the reception and distribution of events in other contexts.

Default context versus other contexts

When you start using Events Hub, you will see that there’s only one pre-configured context: “Default”.

As described above, contexts add one more placeholder to the event posting URL, but the default context has its own characteristic: it does not add any placeholder. See the differences in publication URLs between the default context and other contexts:

Example 3

Going back to the example 1 above, the publication URLs for the topic "latency" will be:

  • "Default" context: <base-url>/alerts/latency

  • "Dev" context: <base-url>/dev/alerts/latency

  • "Testing" context: <base-url>/testing/alerts/latency

Authorization

The endpoints that validate the publisher’s credentials are defined for each context. This is done on the Authorizations screen, which contains two sections: one for OAuth and one for JWT URLs.

After defining the authorization URLs, whenever publishers send requests to a given topic, they will be given permission of access based on the validation of the URL defined for the context.

Example 4

Going back to the example 3 above, we will have:

Context Publication URL Publisher authorization URL

"Default"

<base-url>/alerts/latency

  • OAuth: Authorization URL of the "Default" context (Authorizations  OAUTH  Default)

  • JWT: Authorization URL of the "Default" context (Authorizations  JWT  Dev)

"Dev"

<base-url>/dev/alerts/latency

  • OAuth: Authorization URL of the "Dev" context (Authorizations  OAUTH  Dev)

  • JWT: Authorization URL of the "Dev" context (Authorizations  JWT  Dev)

"Testing"

<base-url>/testing/alerts/latency

  • OAuth: Authorization URL for the "Testing" context (Authorizations  OAUTH  Testing)

  • JWT: Authorization URL for the "Testing" context (Authorizations  JWT  Testing)

Associating contexts and topics

Publishers can send events to a topic only if the topic has at least one context enabled.

Topics are always managed through handlers, which are topic aggregators. In the process of creating and editing handlers, the TOPICS step allows you to create topics and enable contexts for them. In this step, all contexts registered on Events Hub are displayed and the user must enable all contexts that must be made available for the topic.

See more about the process of creating handlers and topics here.

Associating contexts and publishers

When a publisher is registered on Events Hub, it is linked to topics and, for each topic, the contexts that will be available for the publisher must be enabled. After linking the publisher with at least a topic and enabling at least a context of this topic to the publisher, it will be able to sent events to the topic.

To do this, in the TOPICS step of registering a publisher, the user must select all topics which the publisher can send events to. For each of the topics, the contexts available for the topic will be displayed and the user must then select the ones the publisher will be able to publish to.

See more about the process of registering publishers here.

Associating contexts and subscribers

When a subscriber is registered on Events Hub, it subscribes to topics with enabled contexts, representing that it will receive all events sent by publishers for those topics and in the contexts enabled for subscription.

To do this, in the TOPICS step of registering a subscriber, the user must select all topics enabled for the subscriber. For each of the topics, the contexts available for the topic will be displayed and the user must then select the subscription contexts.

See more about the subscriber registration process here.

Creating contexts

Events Hub comes with the context “Default” already created (and it can’t be edited). In addition, other four contexts can be created, totalling a limit of five.

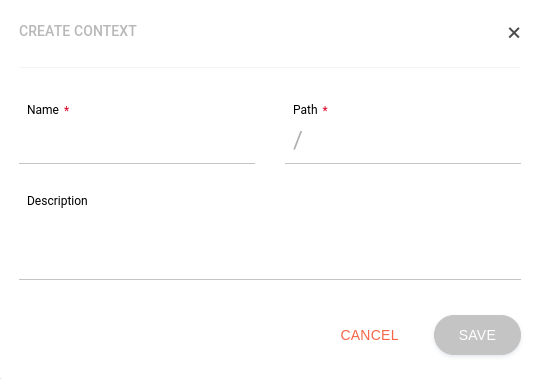
To create a new context, click on the + button, which will take you to this registration screen:

contexts create

You must fill in the following fields:

  • Name: unique name identifying the context.

  • Path: the path will serve as a placeholder for the publication URL (as described above).

  • Description: optional description for the context.

Once registered, the context will be displayed in the TOPICS step of creating/editing handlers and can be enabled for any topic.

The + button is disabled, preventing the creation of a new context. What can I do?

In addition to the default context, you can create up to four more contexts. If there are already five contexts registered, the + button will be disabled. In this case, a new context can be created only if you delete a context that is not associated with any topics.

Context overview

If you click the name of a context on the Contexts screen, you go to the context overview page, as in this example:

contexts overview

The screen lists all topics that are enabled for publication in the selected context, showing the name of the topic, the handler, and the description of the topic (if any). You can search for topics using the Keywords search field, which searches for terms used in the names of topics and handlers or in the description of topics.

Clicking the name of the handler, the user is directed to the handler overview screen, in which it’s possible to edit details of the handler itself or of its topics.

Editing and deleting contexts

The overview screen for each context (accessed by clicking on the context name on the Contexts screen), contains the EDIT CONTEXT button to edit the basic info and icon delete to delete it.

The default context cannot be edited or deleted.

As for other contexts, if they are associated with any topic, it will only be possible to edit the description. If the context is not linked to any topic, it is also possible to edit the name and the field Path.

A context may only be deleted if it’s not associated to any topic. If it is, the user must disable the context for each topic before deleting it.

Thanks for your feedback!
EDIT
How useful was this article to you?