Choice v2
The Choice v2 tool performs a flow deviation within an integration based on the status code, the body or both.
This step is part of the general tools, that help to organize the integration flows.
Now, learn how to add it to the canvas, how to configure its form and check its required settings.
Add Choice v2 to the canvas
-
Click the
 icon from the editing menu on the left.
 -
Select the Choice v2 to add it to the canvas. You can use the search bar
 to find it.
You can add Choice v2 as many times as you need. In this case, each time you add this tool, a number is added next to its name (Choice v2 1, Choice v2 2, Choice v2 3). -
Connect Choice v2 to the flow steps. This tool can be connected to a previous step and to one or more subsequent steps.
To delete Choice v2 from the canvas, select it and click the ![]() button.
button.
Configure the form
-
Select Choice v2 tool on the canvas.
-
Click the
 editing icon.
When you connect Choice v2 to the subsequent step, its configuration form will open automatically. -
Fill in the following fields of the form:
In the section INFORMATION:
-
Name: enter a unique name for the step. By default, you will see it as "Choice v2". Alphanumeric field with a limit of 20 characters.
-
Input Data: select the step that will provide the input data to apply the condition. You will see the request and response data from the previous step.
You have to select input data in the field Input Data to enable editing the steps in the CONFIGURATION section. The section CONFIGURATION will show all the steps that have an output connection with Choice v2 in the canvas.
The alert icon next to the steps will disappear after configuring the form’s mandatory fields. 
-
-
Open the form of each step individually, by clicking the pencil icon on the right of the name of the step. Fill in the following validation conditions:
-
Label: enter a name that identifies the flow deviation. Alphanumeric field with a limit of 50 characters.
-
Type: select one option:
-
WHEN: defines a condition that deviates your integration flow to a specific execution line. If there is more than one step of the WHEN type, the conditions will be executed according to the order of the steps on the screen and you can define the execution order. The option WHEN is selected by default.
-
OTHERWISE: it is executed when none of the WHEN conditions are met. This field doesn’t allow conditions or status code validation. The step of the OTHERWISE type will be the last item of the list. When you choose it, you only have to click CONFIRM.
-
-
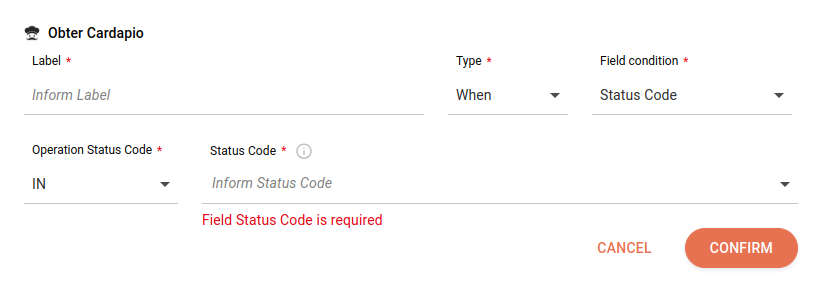
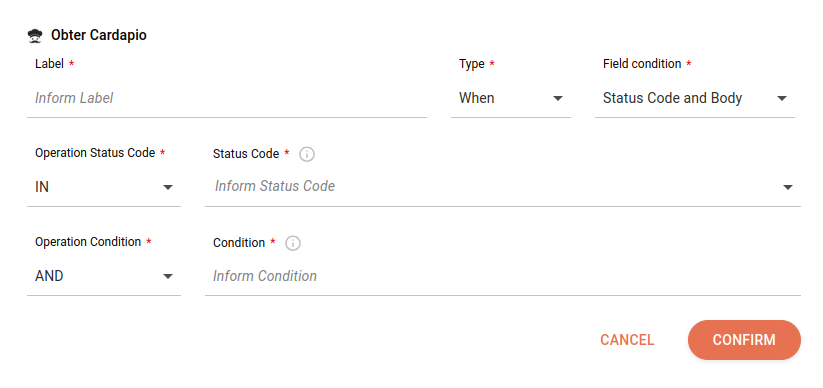
Field Condition: enter the condition that will determine the flow deviation. You can choose between:
-
Status Code: to add conditions based on the HTTP status codes returned by external API calls.
-
Body: to add conditions based on the body.
-
Status Code and Body: to combine both previous options.
The options Status Code and Status Code and Body will only be enabled for selection if you select a response in the field Input Data. Otherwise, the field Condition will only present the option Body. According to the condition that you choose in the Field Condition field, you must fill in the specific fields that follow:
Status Code
-
-
Operation Status Code: select the option IN or NOT IN.
-
Status Code: add specific codes:
200,404,500etc. or the code families:1XX,2XX,3XX,4XXand5XX. You can add more than one code or family code and you can add them alternatively.
Body
-
Condition: add the condition to be applied in the step. Use JSONPath format. Alphanumeric field that allows special characters and blank spaces, with a limit of 1024 characters.

Status Code and Body
-
Operation Status Code: select the option IN or NOT IN.
-
Status Code: add specific codes:
200,404,500etc. or the code families:1XX,2XX,3XX,4XXand5XX. You can add more than one code or family code and you can add them alternatively. -
Operation Condition: select the option AND or OR.
-
Condition: add the condition to be applied in the step. Use JSONPath format. Alphanumeric field that allows special characters and blank spaces, with a limit of 1024 characters.

To create a condition, access the page Creating a condition in JSONPath.
-
-
After you finish configuring the form, click CONFIRM, and to cancel, click CANCEL.
-
Return to the Choice v2 screen and when you finish configuring all the forms, click SAVE.
Share your suggestions with us!
Click here and then [+ Submit idea]