For Each
The For Each tool allows each item in a collection to be processed one by one. This is essential for batch operations in which multiple items require similar handling.
Automating the processing of multiple items reduces manual intervention, which increases efficiency and consistency in data processing.
|
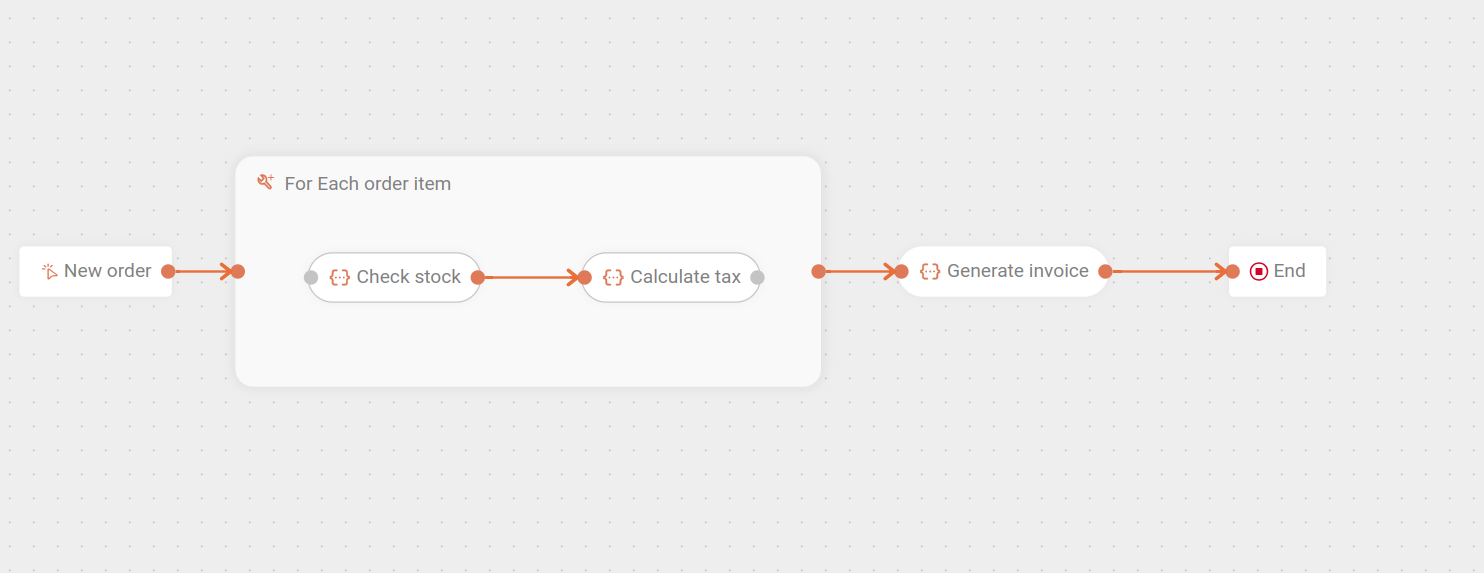
Imagine you have an e-commerce platform that receives customer orders. Each order can have several items (products), and after the purchase, each item in the order needs to be processed individually to perform actions such as checking stock, calculating taxes, and generating a consolidated invoice, for example. In this case, you could use a For Each to iterate over the order items and perform a series of actions for each of these items independently. |
Here’s how the flow described above would look like:

Next, learn how to add For Each to the canvas and how to configure its form.
Add For Each to the canvas
-
Click the
 icon from the editing menu on the left.
 -
Select For Each to add it to the canvas. You can use the search bar
 to find it.
 -
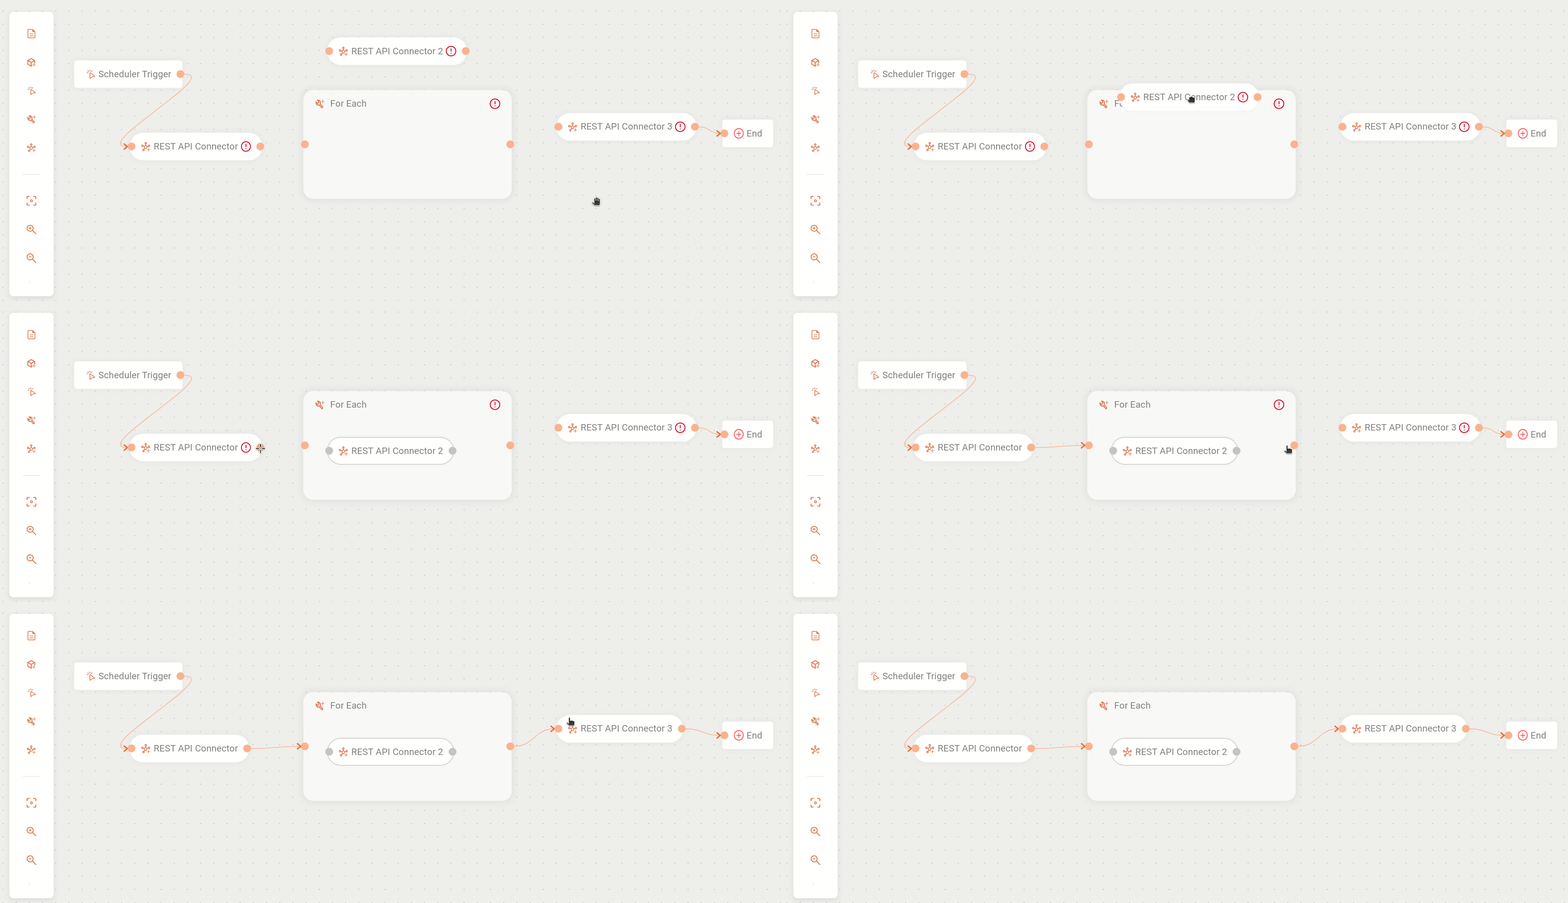
Drag to the For Each board the steps (except triggers) that will be iterated (repeated).
To remove steps from For Each without deleting them from the canvas, there are two buttons:
-
Detach: detaches a single step. Select the step you want to detach and click the third button on the right.
-
Ungroup: ungroups all the steps and leaves the For Each board empty. Select the For Each board and click the third button on the right.
To delete For Each from the canvas, select it and click the ![]() button.
All the steps within For Each will be deleted and the connections removed.
button.
All the steps within For Each will be deleted and the connections removed.
|
You can only have one subflow inside the For Each step, which means that parallel subflows cannot be executed within the For Each.
If there are inactive steps, you will see a yellow alert icon |
Configure the form
-
Select the For Each tool on the canvas.
-
Click the
 editing icon.
 -
Fill in the following fields:
-
Name: enter a unique name for the step For Each. This is an alphanumeric field that allows special characters and blank spaces, with a limit of 20 characters.
-
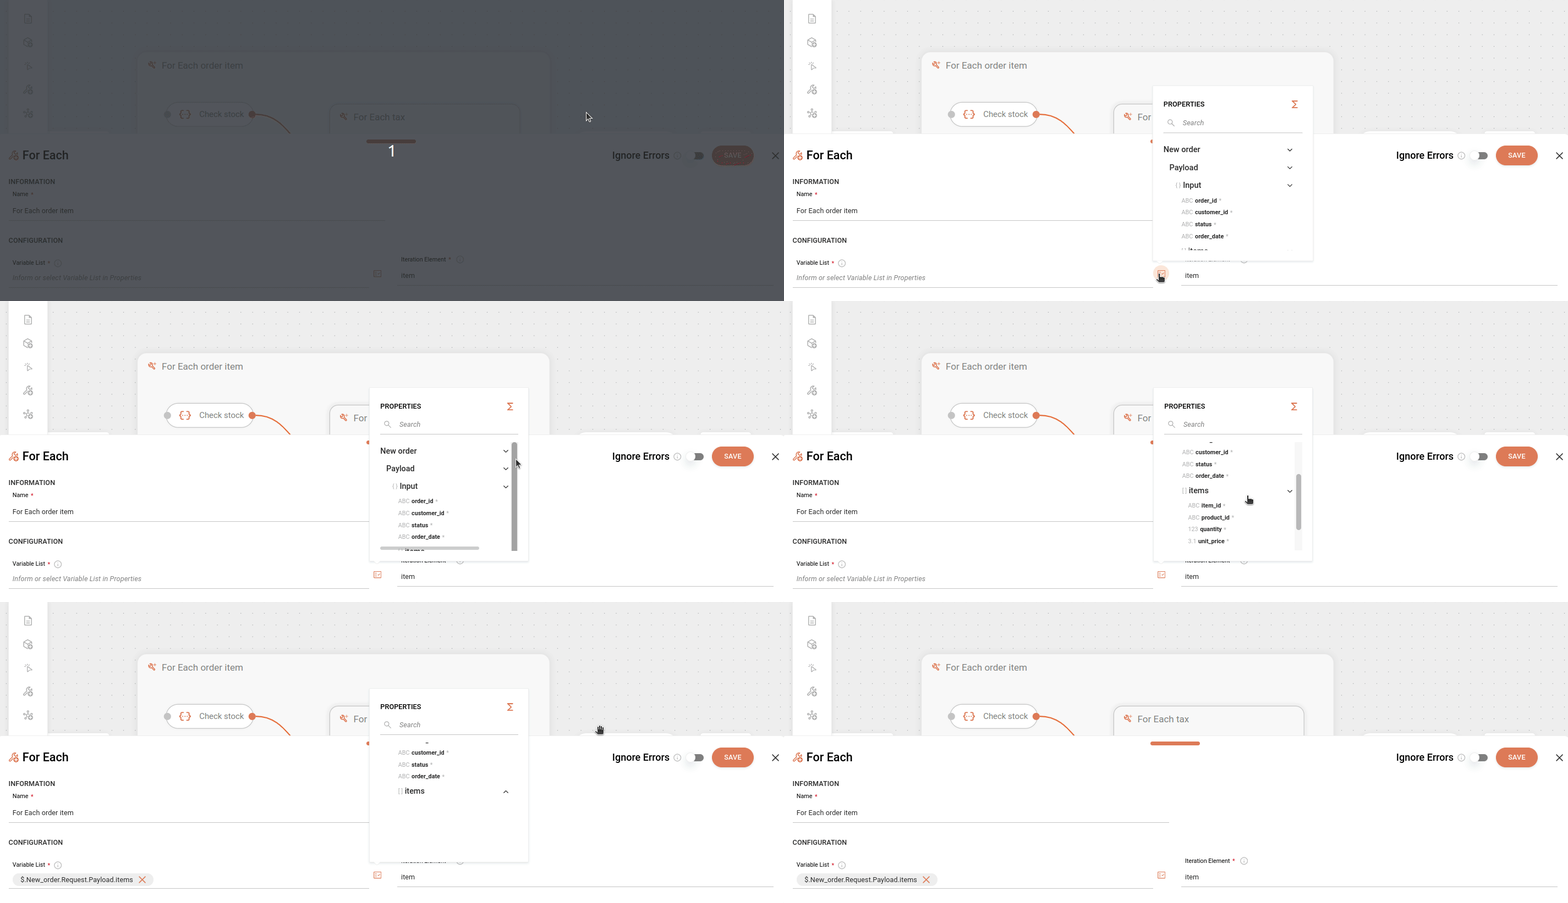
Variable List: insert the list of variables to be executed, that is, the list that contains the items that must be executed individually. The values must be an array (list). This is an alphanumeric field that allows special characters and blank spaces, with a limit of 1024 characters.
Below, we demonstrate the selection of a list (array) of items (via Properties
 ) to be processed by the For Each tool.
 -
Iteration Element: name of the structure that identifies the elements that will be repeated inside For Each. This is an alphanumeric field that allows special characters and blank spaces, with a limit of 250 characters.
You can see the name of the element to be iterated in Properties or in the Data Mapping (FROM/TO) of the steps that are within For Each. The amount of repetitions is determined by the amount of items in the array (list).
-
-
Configure the Ignore Errors button: by default, the button is disabled and you can enable it.
Enabled 
Disabled 
Execution continues, even if there are errors in the process.
Execution will be stopped immediately.
The logs show the step with an error.
The logs show the execution up to the last iteration.
Steps after For Each will be executed.
No step after For Each will be executed.
-
Click SAVE.

| See an example of integration with CRM and For Each. |
For Each within For Each
You can add a For Each within another For Each. This way, your integration flow will process data in structures with nested loops.
|
Consider the previous example of a flow with an order that contains several items (products). Imagine that each item is subject to two types of taxes.
Thus, we have a list (array) within another list:
|
This would be a visual representation of this integration:

| To move a step between two For Each boards, you must detach it from the initial For Each. To do that, click X and drag it to the new For Each. |
Ignoring errors
When a flow has a For Each within a For Each, the following rules apply to the Ignore Errors button:
| "Ignore Errors" in outer For Each | "Ignore Errors" in inner For Each | Result |
|---|---|---|
Disabled |
Disabled |
The flow will be interrupted if there is an error. |
Enabled |
Enabled |
The flow will NOT be interrupted if there is an error. |
Enabled |
Disabled |
The entire outer For Each iteration will be executed. |
Disabled |
Enabled |
The flow will NOT be interrupted if there is an error. |
Expression Builder
The Expression Builder component allows you to create expressions with parameters and variables through functions and conditions available within the component. This allows you to adjust the expressions to meet your needs.
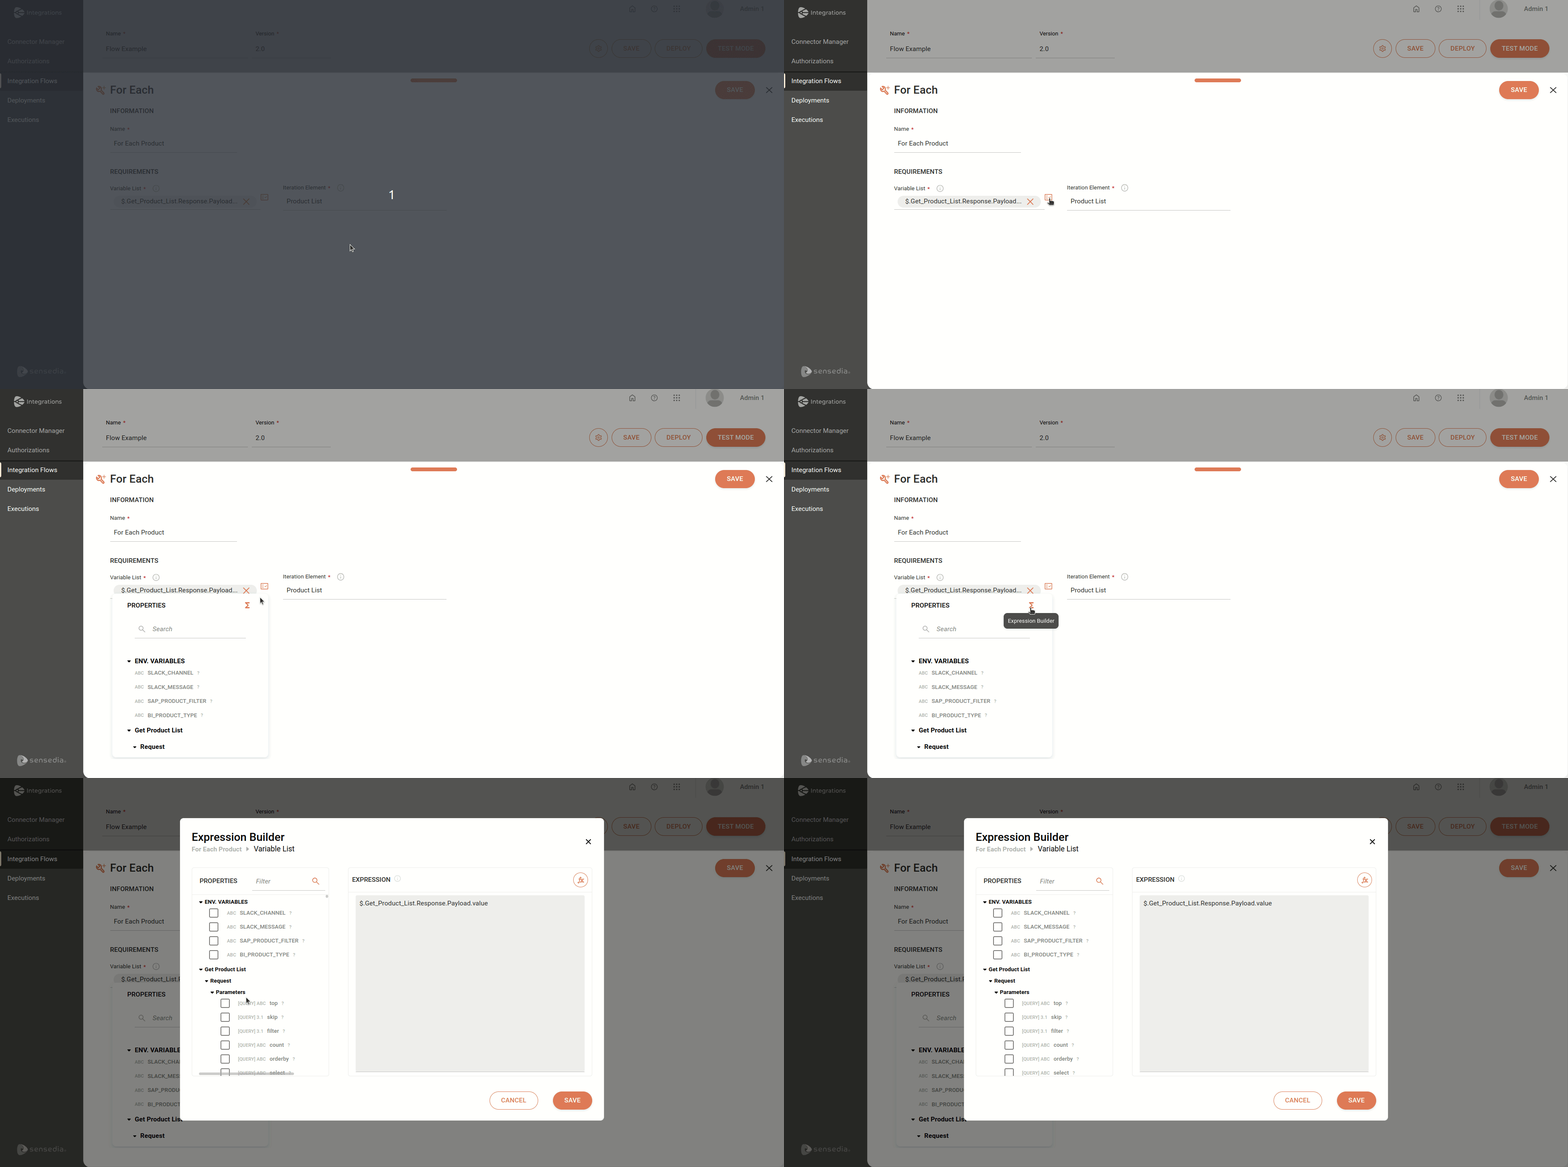
Follow the steps below to access the Expression Builder screen:
The Expression Builder screen contains the following sections:
-
Properties: shows data from previous steps and from the environment variables. Filter the attributes using the search field at the top of the section and then click the
 icon.
You can select more than one attribute.
When selecting it, the attribute will appear in the Expression field.
 -
Expression: field to enter the input attributes or to create an expression by clicking the
 button on the right.
Only the Concat function is available to create the expression.
| When selecting two or more attributes in the Properties field, you must create an expression. |
To save the information, click CONFIRM.
Share your suggestions with us!
Click here and then [+ Submit idea]


