ERP Systems
Creating and editing a connector
To create a connector, follow the steps below:
-
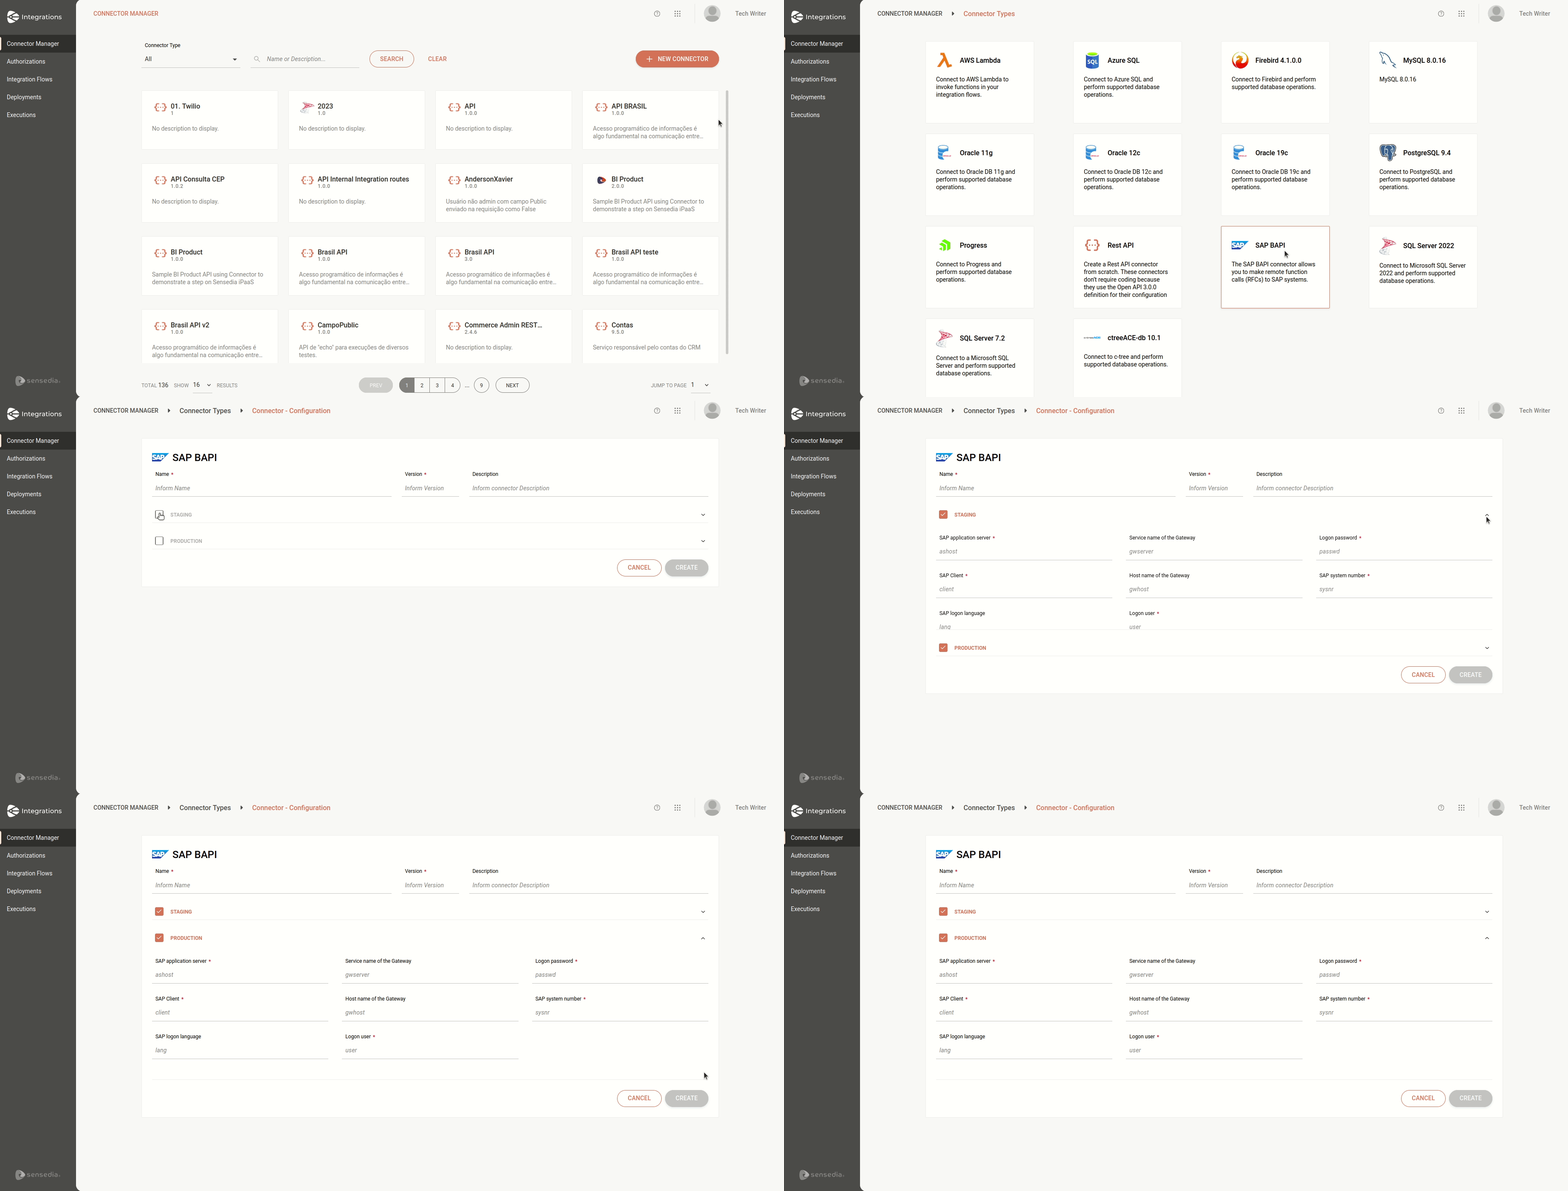
Access the Connector Manager screen from the left-side menu or by clicking the card in the Welcome screen.
-
Click + NEW CONNECTOR at the top right of the screen.
-
Select the card of the connector you want to create.
A new screen, Connector Configuration, will open. Fill in the following data in the connector’s form:
-
In Name, give the connector a name.
-
In Version, enter the version of the connector.
-
In Description (optional), add a description.
-
Select the environment in which you will deploy the connector.
-
Inform the values for the required fields for each connector.
-
Click CREATE.

| If you select both environments, you must fill in the complete data for both of them to be able to create the connector. |
To edit the connector, follow the steps below:
-
Click the connector you want to edit.
You can change:
-
The description, in Description.
-
The environment selected for deployment: staging or production (it is mandatory to have at least one environment enabled).
-
The values in the selected environment, even if the connector is being used in a flow.
-
-
When you have finished editing, click SAVE.
| You cannot delete a connector while it is being used in an integration. |
Required fields
SAP BAPI
SAP Application Server |
The hostname or IP address of the SAP application server you wish to connect to. |
Service Name of the Gateway |
The service name identifies the specific service or port on the SAP gateway through which communication will occur. |
Logon Password |
This is the password associated with the SAP user specified in the "Logon User" field. It is required for authentication purposes to establish a connection with the SAP system. |
SAP Client |
The client number you wish to connect to. Different clients may contain different sets of data or configurations. |
Hostname of the Gateway |
The hostname or IP address of the SAP gateway through which communication will be routed. |
SAP System Number |
The system number uniquely identifies an SAP system within a landscape. It is essential for directing communication to the correct SAP system when multiple systems are running on the same host. |
SAP Logon Language |
Specifies the language in which the SAP system should present messages and user interfaces. |
Logon User |
The username of the SAP user with which the connector will authenticate in the SAP system. |
| See more details about SAP BAPI with instruction examples and common configuration issues. |
Tasy
Database |
The name or identifier of the database instance you want to connect to. |
Host |
The hostname or IP address of the server where the database is hosted. It is essential for establishing the network connection to the database server. |
Owner |
The owner of the database schema or the user who owns the objects within the database. |
Password |
The password for the database user. |
Port |
The port number on which your server is running. |
Role |
Sets of privileges that can be granted to users or other roles. Roles can provide additional permissions beyond those granted directly to the user. |
Username |
The username for the database. |
Configuring a connector
After creating the connector, you have to configure it in the Flow screen. To do that, follow the steps below:
Adding the connector to the canvas
-
Access the Integration Flows screen and select the integration flow.
If you want to create a new one, click + NEW FLOW and access the Flow screen.Check out our tutorial about how to create your first integration flow. -
Click the
 icon in the editing menu on the left.
 -
Choose the connector you want. You can use the search bar
 to find it.
 -
Connect it to a previous step if you want to use the properties of other steps.
|
To copy the step, click the |
To delete the connector from the canvas, select it and click the ![]() button.
button.
Configuring the form
-
Select the connector on the canvas.
-
Click the edit icon
 .
. -
Fill in the following form fields:
-
Name: enter the connector’s name.
-
Connector: select one of the registered connectors.
-
Timeout: enter the request timeout in milliseconds.
By default, the value will be 3000 milliseconds and the maximum value 60000 ms.
By clicking the  icon to the right of the Timeout field, you can filter and display environment variables and the payload of previous steps (if the steps are connected) for use in configuring the timeout.
-
Properties: use the environment variables and properties of previous steps to create your script in Instruction.
-
Instruction: create your script by entering the input attributes or by creating an expression by clicking the
 button on the right.
The Concat function is available for creating the expression.
This field contains the native syntax of the protocol to which the connector provides access. -
Ignore Errors: by default, this button is disabled and you can enable it.
Check more details about the function of Ignore Errors on the table below:
Enabled

Disabled

Execution continues, even if there are errors in the process.
Execution will be stopped immediately.
The logs show the step with an error.
The logs show the execution up to the step with the error.
The following steps will be executed.
No further step will be executed.
-
-
Click SAVE.
Share your suggestions with us!
Click here and then [+ Submit idea]